Equipment Reviews
These reviews are not highly technical break downs, they are findings based on real-life usage by Steve Wilce of the products listed below.
Contents:
1. Canon EF 500mm V EF 600mm f4.0 Telephoto lens. Click here to read Item 1.
2. Manfrotto V Jobu Gimball Heads. Click here to read Item 2.
3. Canon EF 17-40mm f4.0 L USM Wide-angle Lens. Click here to read Item 3.
4. Manfrotto MT057CS3 Tripod. Click here to read Item 4.
5. Canon EF 600mm f4.0 IS Mark 1 / Mark 2 Comparison. Click here to read Item 5.
6. Manfrotto MHXPRO-3W Tilt and Pan Tripod Head. Click here to read Item 6.
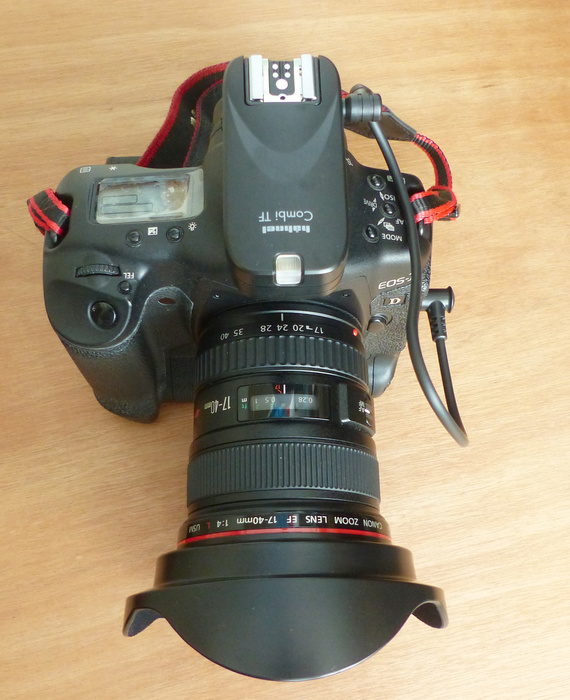
7. Hahnel Combi TF remote control. Click here to read Item 7.
8. Vortex Razor HD 10 x 42 Binoculars. Click here to read Item 8.
9. Sigma 150-600mm (Contemporary) f5-6.3 OS Zoom Lens. Click here to read Item 9.
10. XIKEZAN 12mp / 1080p Trail Camera. Click here to read Item 10.
11. Vanguard Alta Sky 66 Long Lens Backpack. Click here to read Item 11.
12. Canon EF 100mm f2.8 L IS USM Macro Lens and Yongnuo YN24EX Twin Macro Flash. Click here to read Item 12.
13. Canon RF100-500 f7.1 lens. Click here to read Item 13.
_____________________________________________
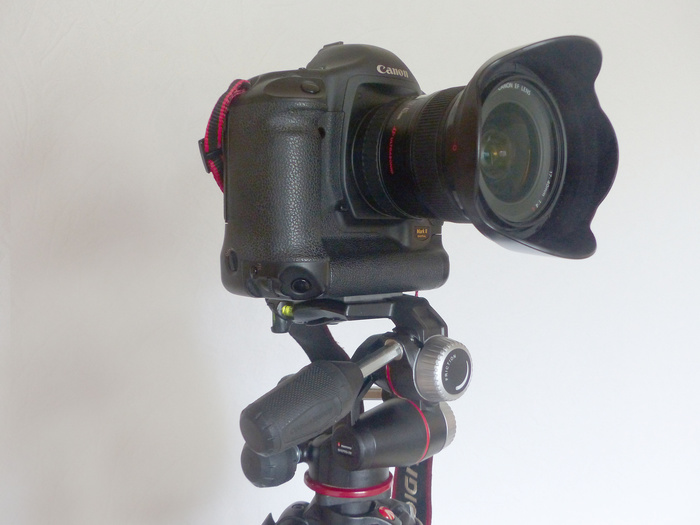
Item 1
1. Canon 500 V 600
This is an ongoing question asked by people who are thinking about taking up Wildlife Photography;
I have used both the Canon 500 and 600 F4.0 extensively, so I feel I am fairly well qualified to air an opinion on their pros and cons.
The first thing to consider is the cost, which I admit is quite considerable, you could buy a small family car instead. In addition, once you have decided to buy one of these lens, self doubt will creep into your mind, you will begin to think whether you can or cannot justify the expense. The only evidence that your spending was justified will be the quality of the images you produce, there are no excuses.
The first time you use one of these big prime lens you will be somewhat taken aback by their unwieldy nature and also their weight, you will be terrified of damaging them, dropping lens like these onto concrete or tarmac is the stuff of nightmares and so the very first thing you should do is contact your insurance company to arrange extra cover.
You will not be covered under your normal insurance policy!
I see people running along carrying these lens over their shoulder while still attached to their tripods, they think because their lens is attached to an expensive head this provides some sort of impunity from damage. I would not recommend doing this because it doesn't matter what type of head is supporting your lens, the only thing that is preventing the lens hitting the ground is the integrity of the 1/4 or 3/8 inch tripod head bolt. If this bolt shears then the head and lens will hit the ground.
If that hasn't frightened you off we can get down to the pros and cons of these individual lens.
These lens along with Nikon are the most used big prime lens bar none, they have dual mode image stabilization designed to limit lens movement and it really does work very well, it can allow the user to shoot at very low shutter speeds, which wouldn't be possible otherwise.
They both have lightning fast auto focus which locks onto the their target instantly, this auto focusing itself has three positions which allows the lens to focus in three distance bands. If you want to focus quite closely or medium distance or if you are focusing on a distant object, this feature allows the lens to operate in a particular range so it focuses quicker without 'hunting'.
In all these features both these lens are identical, they both produce razor sharp images, are both built to professional standards, ie weather sealed and built like a tank.
The burning question is, which is the better wildlife lens.
Lets take focal length;
This is always the biggest question facing prospective users of these lenses, is the 500 long enough or do I need the 600?
Although the 600 is only 100mm longer in focal length than the 500 this does not mean that images seen through it are 20% larger, this is a common misconception!
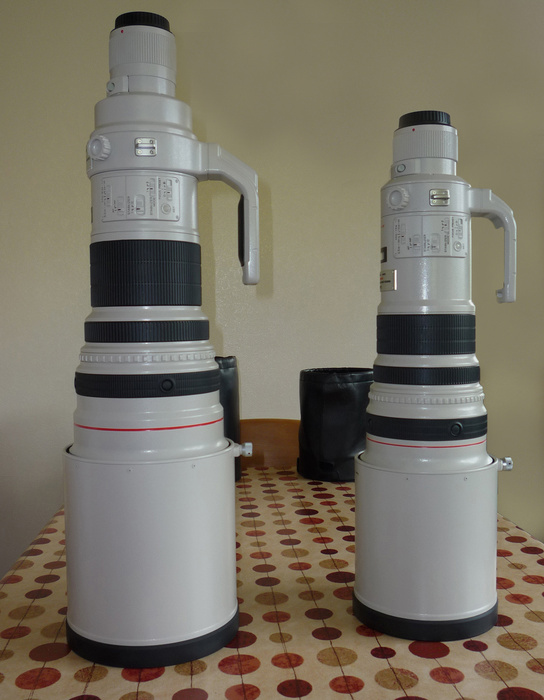
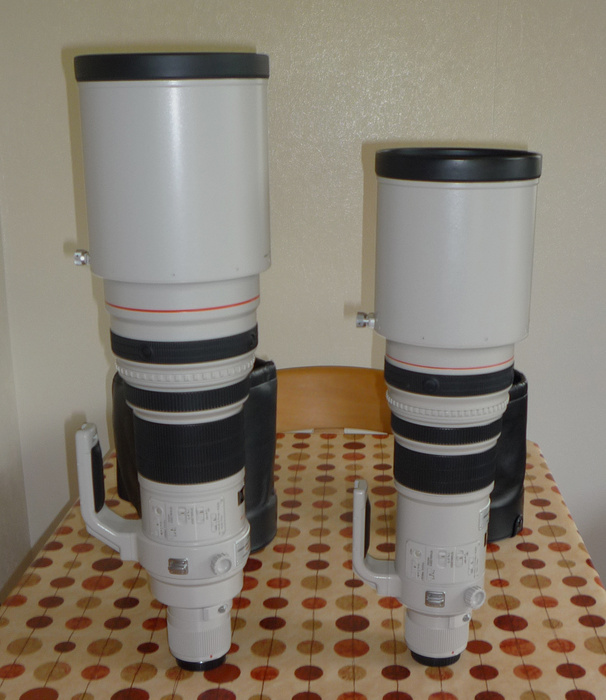
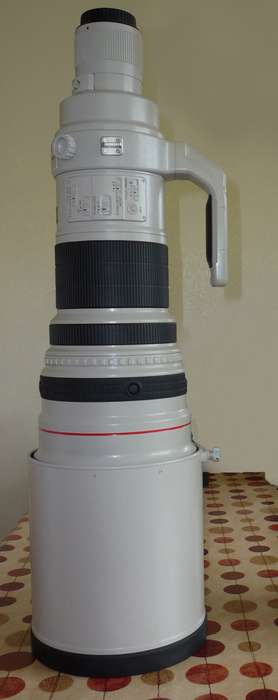
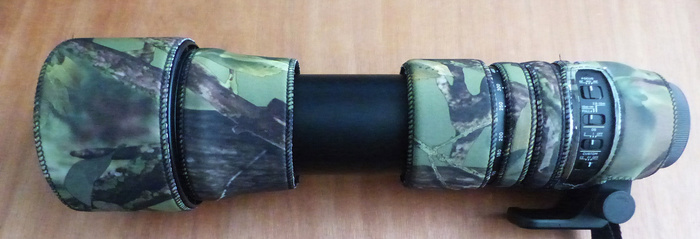
Look how the 600 dwarfes the 500!!
Images seen are two dimensional so it is the focal length squared that applies eg.
500 x 500 = 250000
600 x 600 = 360000
This means that the 600 sees an image which is 44% larger than the 500.
This is a considerable amount.
Further;
A 500 mounted on a Canon 7D will give you 500 x 1.6 = 800mm focal length.
A 600 mounted on a Canon 7D will give you 600 x 1.6 = 960mm focal length.
Add to this a 1.4 converter and the gap grows even more;
500 x 1.6 x 1.4 = 1120mm.
600 x 1.6 x 1.4 = 1344mm.
Both lenses retaining auto focus and image stabilization.
On my Canon 1 series body with a x 2.0 converter;
500 x 1.3 x 2.0 = 1300mm.
600 x 1.3 x 2.0 = 1560mm.
Both lenses retaining auto focus and image stabilization.
This is why I kept my old Canon 1D Mk 2.
These bodies retain auto focus up to f 8.0.
So my maximum reach is 1560mm with auto focus and image stabilization!
No contest you might think, until you factor in a few other considerations;
The 600 is £2,000 pounds more expensive than the 500.
The 500 weighs around 8.5 lbs
The 600 weighs around 11.6 lbs
Not much perhaps, until you carry it, I can say from experience that it is a great deal of difference, it is much heavier.
The 600 is 0.8 inches bigger in diameter, so what? until you find it's more than you think and you can't fit it through the opening in your local bird hide.
The 500 minimum focusing distance is 14.8 feet.
The 600 minimum focusing distance is 18 feet.
The 500 has a clear advantage here.
The 600 is nearly 3 inches longer, not much? but you can't fit it in most lens bags.
You could just about get the 500 into your hand baggage on a plane, the 600, absolutely no chance whatsoever!
The 500 can just about be mounted on a high quality Ball Head on your tripod, with the 600 you absolutely must have a 'Gimbal' type head, a further expense, as much as 500 pounds!
This is starting to even out!
The bottom line is, if you want to photograph smallish animals like Hares, Otters and Stoats discreetly from a distance or medium to large size birds and if you want to be mobile or travel abroad, then I wouldn't hesitate buying the 500, you will not be disappointed. This lens coupled with a 1.4 converter and using a portable hide is a killer combination and I highly recommend it.
If you want to photograph very small birds or very shy wildlife and you are reasonably fit, and be assured you will need to be. There is no better lens than the 600 for the job, all forms of wildlife are shy and the further away you can take images from the better. This is where this lens comes into its own, you can stay further away from your subject while having the same magnification as the 500. I also highly recommend this lens.
Assuming finance is not a problem, the choice is far from easy, you have to balance portability with reach. I find that with the 500 I tend to leave the 1.4 converter on all the time, with the 600 you can shoot with the bare lens more often.
This gives you 1 stop more of light which is a big advantage in most situations.
I would recommend trying before you buy, every wildlife photographer wishes they had more focal length, I do on a regular basis. However, if your favourite lens is too heavy to carry.......................
For comparison the Canon 600, 500 and 300 f4.0 lens.

___________________________________________________________________________________________
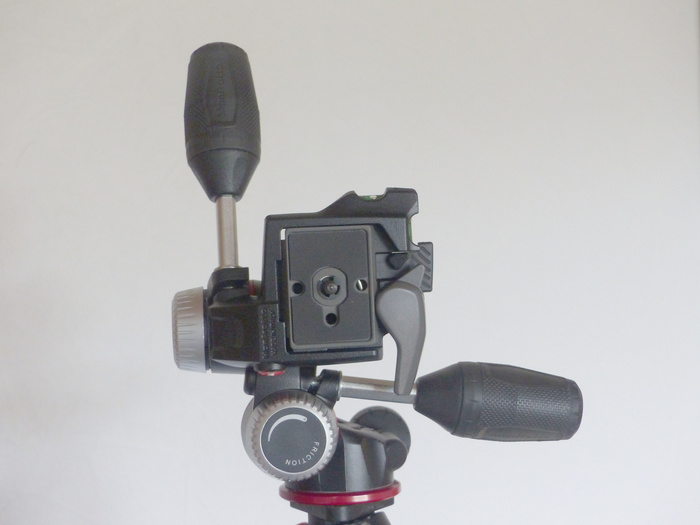
Item 2
2. Manfrotto 393 V Jobu Pro 2B Gimball Head
It's that quiet time of the year again, not many birds around, so I thought I would examine the merits of two tripod heads.
Based on my experience.
I stated previously in a Canon 500 V 600 review that a Gimball type head is an absolute necessity if you are using the largest of the telephoto lenses and I absolutely stand by that statement!
A Gimball head design is where a lens sits on a cradle and once it's balanced it becomes almost weightless as all the weight is transferred down through the tripod and movement of the lens is very easy indeed. This is a far superior method of supporting a large lens than for example using a ball head where the lens can tilt over if the friction on the ball cannot overcome the lens weight.
Most people, myself included feel quite faint when they see the huge cost of some Gimball heads. The question is are they worth all that extra money or can we get away with using a much cheaper head?
Until about five years ago the Wimberley Gimball head was the only head of this type available and it retailed for around £500. However, there are now about a dozen manufacturers of these type of heads, some very good, others quite frankly are rubbish, they may seem good value but the old saying 'you only get what you pay for' is very true.
A number of years ago I decided I would not pay the Wimberley price, I felt a price of £500 was really over the top and questioned how they could justify charging that much.
I realised, however, very early on after buying my first big prime lens that I would have to upgrade my tripod and head, that much was obvious after I tried to mount a Canon 500 f4 on my old set up. I fortunately bumped into a man who was having the same trouble as me and he showed me his new head which looked very sturdy and cost only £99. I immediately bought one and was very pleased with its performance.
That head was the Manfrotto 393 Long Lens Bracket and it has become very popular with photographers all over the country.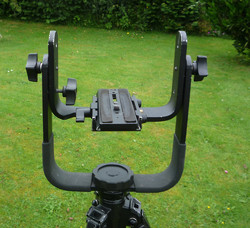
I used this head for over a year and was very happy with it, getting good results for most applications, however, problems started to appear. This head relies on friction to keep its cradle in a particular position, the 'U' shaped cradle sits inside another bigger 'U' shaped bracket and two bolts pass through the cradle and bracket and friction is applied by tightening these two bolts via two knobs on the sides of the bracket. There are two tiny ball races in between the bolt washers and these are the only means of smoothing out the movement of the cradle, but they are totally inadequate.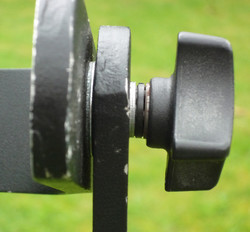
Unfortunately after you tighten the bolts and then move the lens back and fore the bolts tend to move with the backward and forward motion and become loose again. All this tightening and loosening wears the threads on the bolts and the thread on the bracket until in the end they will not tighten any more and the cradle will not support the lens in an angled position. The same applies to the thread that connects the head to the tripod,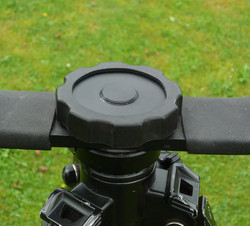 this time panning of the head loosens the connection. In the end after one pan or a few back and fore movements of the cradle everything needed to be tightened up again. This became unworkable and I realised I had to look at other Gimball type heads.
I knew I had to pay so I did a great deal of research on the heads available. Previously I mentioned Wimberley had been the benchmark for years, but nothing stands still and I looked at five different heads in great detail. Finally I decided on the Jobu Pro 2B, the latest Gimball head from this company.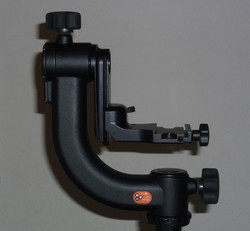 I decided on this head after contacting Jobu and having prompt, very honest and constructive feedback. The features that persuaded me to buy this head over, in particular the Wimberley Mk2 were, this head uses full roller ball bearings on all articulations, Wimberley still use sleeve bearings, the main supporting arm is the stiffest and strongest of all the heads I looked at,
 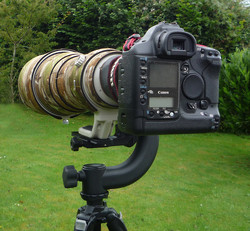 this was achieved without dramatic weight increase, also this head has a locking device that prevents the lens from moving when being carried.
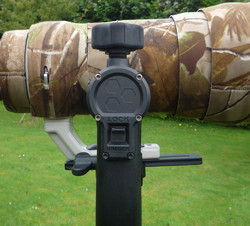 A simple device but something other Gimball head makers need to feature as it is a frequent criticism of these heads, particularly the above mentioned Manfrotto. Lens movement in this way can very easily lead to damage.
The Manfrotto and Jobu heads weigh about the same, 3.5lbs, both with a 3/8 inch mounting thread. I will never use a tripod with less than a 3/8 inch thread, a 1/4 inch is not strong enough for these heads and adding a 1/4 to 3/8 inch thread adaptor doesn't give any more strength.
Finally the day came and when I unpacked the Jobu head it just screamed quality, I could see without touching it how strong it was, when I mounted it to my tripod I hand tightened the locking ring and it has not moved a millimetre from that day onwards. After fitting the mounting plate to my 600 f4 lens, fitting it into the head clamp and balancing up, the merest caress of the friction knobs is enough to instantly position the lens at any angle.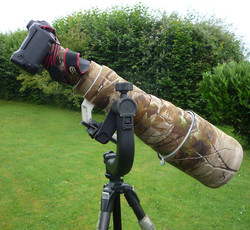 I cannot believe how smooth the panning and tilting actions are, they are an absolute dream to use. I can loosen the panning knob right off and spin the lens around a hundred times and the locking ring just stays absolutely still, then one millimetre of friction and it's all locked up again.
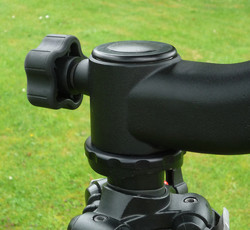
This head is an engineering masterpiece!!
The mounting plate and cradle adjustment knobs have stops, meaning you cannot lose them, the friction knobs are soft rubber coated for ease of use. The cradle can be adjusted vertically, an operation which is as smooth as silk, and the plate which unfortunately you have to buy separately, has pins to stop the lens from sliding out.
There is no comparison in these two heads, now I know what I have been missing, it's expensive but I cannot see me buying another head for the rest of my days it is such high quality.
The only redeeming feature of the Manfrotto head is the good quality mounting plate which comes free, with the Jobu and all other makes you have to buy the mounting plate separately.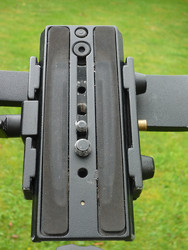 The cost of the Jobu head was £593 with the plate, some people will inevitably say that you could buy five Manfrotto heads for the price of this one, they currently retail at £125, but you will never achieve the smoothness of operation and quality of this Jobu head.
____________________________________________________________________________________________
Item 3
3. Canon EF 17-40mm f4.0 L USM Wide-angle lens.
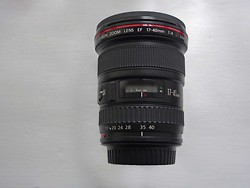
I have been thinking of buying a wide-angle lens for some time, but it was not an easy choice. There are a large amount of wide-angle prime and zoom lenses on the market and making a final choice is far from straightforward. I started by deciding whether to get a prime or a zoom. I am not normally a zoom person but with wide-angle lenses for landscapes, that is what it would be used for, I felt a zoom would be easier for composition.
The next decision was which manufacturer? One was Canon because of my Canon cameras and the other was Sigma who produce a very good range of wide angle lenses. Having done much research I decided to stick with Canon purely for the build quality and the compatibility with Canon cameras.
Next was what focal range would suit best, I didn’t want an extremely wide lens because I don’t like the way the images look, for me they become distorted and out of perspective. I always like, if possible, to retain a natural look to an image.
Finally it came down to the Canon ef 16-35, L, f4.0, is, USM or the Canon ef 17-40, L, f4.0, USM.
The Canon 16-35 lens retails for about £1100 and the 17-40 retails for about £580.
What I needed to find out was if the 16-35, that was double the price, was twice as good as the 17-40.
The answer to this question is an emphatic NO!!
The 16-35 is undoubtedly sharper wide open but once the 17-40 is stopped down there is very little difference in sharpness.
Because of this I decided on the 17-40, which I managed to buy at £529.
This is a Canon 'L' series lens, it has the 'Red Line' designating this, the 'L' series are the highest quality lenses that Canon make.
It comes with a soft pouch, which is not much use really and a large ‘Petal’ type hood, which I’m not sure does anything but all these type of lenses seem to have them these days.
This lens weighs in at just over 1lb so carrying it around is really comfortable and you wouldn’t know it was in your bag.
It focuses so quietly that you think that nothing has happened, until you look through the viewfinder and see your image perfectly in focus.
The images it produces rival the much more expensive Canon 16-35 once the lens is stopped down.
It focuses down to 11 inches so getting close to the odd insect while on your travels is quite easy.
The 17-40's filter size is quite large at 77mm, so good quality filters are quite expensive, nevertheless two things you should budget for are an UV filter to stay on the lens permanently for protection and to filter sunlight and cut down haze. Furthermore a most important addition is a good quality circular polarising filter to minimize unwanted reflections and to give your images richness, contrast and clarity, without affecting the colour balance. One advantage with this lens is that the front element does not rotate making the use of circular polarising filters easy, as once set they do not move when zooming or focussing.
One word of warning when buying expensive filters for these lenses.
It is always advisable to buy the slim line variety of filters such as the Hoya Pro 1 digital range. They are of a slim line design because they do not cause vignetting when very wide-angle lenses are used on full frame or 1.3 cropped bodies. A Hoya Pro 1 polarising filter can be attached to the already attached Hoya Pro I UV filter without any vignetting affecting the image. While some of the ‘high walled’ cheaper filters may seem a good buy, they will be a false economy when you have dark shadows in the corners of your images!!
The Canon 17-40 is best used on a full frame or a 1.3 cropped camera body where it will produce very high quality landscape images. However, on a 1.6 cropped body like a 7D, although vignetting will become non-existent, the lens ceases to be a really wide-angle lens.
It would be unfair of me not to extol the virtues of the Canon 16-35mm f4.0 lens because it is a flagship Canon ‘L’ series lens with image stabilization and if you want to take photographs indoors or handheld or you operate in relatively low light conditions then this is the lens for you.
The only thing that stopped me buying this lens was I didn’t feel it justified the price compared with the 17-40.
I personally don’t need image stabilization for landscape photography.
For best results I use the Canon 17-40 lens on a lightweight carbon fibre tripod with a corded shutter release. I can easily carry this lightweight combination all day if required.
These factors lead me to conclude that if you want a high quality wide-angle lens that is reasonably priced and easily carried around, that produces sharp colourful images which are full of contrast, then this is the lens for you.
Image below taken with a Canon 1DMk2 DSLR / Canon 17-40 f4.0 lens / Hoya Circular Polarizing filter. Manfrotto lightweight carbon fibre tripod with a Manfrotto 3 way tilt and pan head (See Reviews), / Canon corded shutter release.
I highly recommend the Canon 17-40mm f4.0, ‘L’ series lens.
____________________________________________________________________________________________
Item 4
4. Manfrotto MT057CS3 Carbon Fibre Tripod.
In previous equipment reviews I made it quite clear that I thought the Jobu Pro2B gimball head was a fantastic bit of kit. Nothing has changed, it continues to perform flawlessly, however, after a few months I have developed a distinct feeling that this head is too big for the tripod I was using, the tripod being the Manfrotto 055 CX3.
With a Canon 600mm F4.0 lens and a 1 series body mounted on the Jobu head it appears that this combo is too much for the tripod. I always thought that this might be the case especially in windy conditions.
Lately this has become apparent, as I tend to put one arm over the lens to steady it in windy conditions. When doing this I could feel the 055 tripod legs bending, so I have decided to invest in a new and more robust tripod.
The Gitzo range of tripods immediately came to mind, expensive, but supposedly the best!
I never buy any equipment without meticulously examining every possibility. Therefore I ran the microscope over the latest Gitzos and what I found did not make pleasant reading.
Lately there has been repeated material failure on these tripods and nearly all in the same place. Where the tripod legs attach to the tripod platform, as in all tripods, a bolt passes through the drilled hole in the platform and leg. This area, even to a non-engineering person would be identified as a crucial stress area where strong components would be used. This, however, with Gitzo tripods does not appear to be the case. The platform on these tripods is made from a Magnesium/Aluminium alloy, quite common these days with many manufacturers, including Manfrotto, minimizing tripod weight. It would be logical to assume therefore that attention to the thickness of the alloy in this area would be paramount. The fact is that on Gitzo tripods, after examination, it appears the alloy in this area, where the leg bolt passes through the platform, is in places no more than 3mm thick.
Also if the coating on this alloy is chipped by accident, there have been instances where the alloy has started to ’Powder’ and crumble.
Here is an typical example of this material failure.

This is not just a matter of buying a new leg, the whole tripod is ruined!
Secondly I don’t like the new ‘Systematic’ platform design. In theory it is practical to be able to interchange heads between platforms but the way the various heads are mounted on the tripod platform is a recipe for an accident if ever I saw one. Your equipment is screwed into a round plate via a 3/8inch screw, no problem there; however, this plate then fits into a metal ring in the middle of the tripod platform. Both plate and ring are machined for a tight fit and the ring is then tightened around the plate by a screw. However, if this screw works loose the plate is free to pull out of the ring and this has happened with catastrophic results.
Thirdly there are some horror stories regarding Gitzo after sales service, in short they don’t want to know about problems. Getting through to them is apparently an achievement and then the real battle starts. Whatever you do don’t go near salt water with a Gitzo tripod because it invalidates the already very tenuous guarantee.
This is something you don’t expect from a tripod that can cost up to a thousand pounds!
I then found out that Gitzo have moved their manufacturing base; this is always done to save costs.
Also it is Manfrotto / Bogen who carry out repairs for them because they don’t appear to have the repair infrastructure to support their product.
It is sometimes amazing how a company can perpetuate a myth regarding quality and then appear to sit on their laurels.
This doesn’t wash with me because I only deal in facts.
I was thoroughly put off Gitzo Tripods after this research.
My problem was I didn’t know of any other tripods that were robust enough to support my equipment and didn’t involve re-mortgaging my house.
After more research I came across the Manfrotto 057 series of tripods, which were at the top of their range.
These tripods were retailing between six and seven hundred pounds depending on whether it was the three or four section. I still considered this to be large amount of money for a tripod. However, I really liked the look of them, they seemed very robust and there were really good reviews supporting this. I battled on with my 055 series Manfrotto for a couple of months until I was looking on Amazon and they were retailing the 057 three section tripods for three hundred and eighty pounds. I bought one immediately, I don’t need the four section because it is just too tall for my needs.
I have just taken delivery of the 057 tripod and what a piece of equipment it is!

It is without doubt the most robust and well-made tripod I have ever handled. I am over the moon with the quality in every aspect. The legs are made from 100% carbon fibre with Magnesium castings throughout the rest of the tripod.
The top tube diameter of the 057 tripod is 39.2mm as opposed to 29.2mm on my 055 tripod. The legs on the 057 have a really solid feel to them and they wont bend at all.
It is 132cms in height without the centre column raised; I don’t raise the centre column if I can possibly help it. However, when the centre column is fully raised the tripod is 157cms high.
When my 600 Canon lens and the Jobu head are mounted on the 057 tripod and the centre column is fully down, the camera viewfinder is exactly at eye level for me and I am six foot tall.
I established this prior to buying; it’s no good finding out after delivery. The tripod when fully closed measures 62cms.
The tripod platform is so much bigger and stronger than on the 055 tripod and it looks fully up to the job of supporting my kit. It has a 3/8inch tripod head screw.

The 057 has retractable spiked feet for different ground conditions.
There is also a built in spirit level at the bottom of the centre column, which you can conveniently look down on.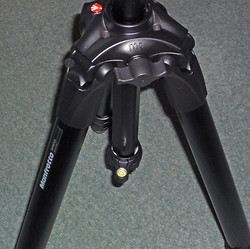
The centre column is 35mm in diameter and it is three faceted so it cannot rotate. It can also be removed for low level shooting and the minimum tripod height is then 22cms. The legs have three angle positions, adjustments can be made quickly and simply by pressing a locking tab.
This tripod is rated to support up to 18Kg of weight, more than enough for any combination.
It weighs 3Kg and therefore it is not a tripod for supporting your telescope, or for carrying long distances, it is too heavy, that would be better suited to the 055 series.
I now use my 055 for my landscape kit, still a very good tripod and ideally suited for mounting a ball head and camera.
To conclude; the Manfrotto 057CS3 / CS4 are exceptionally well made tripods, perfect for supporting a large lens and a heavy gimball head. The current retail price of £382.00 on Amazon is a real bargain; so if you are looking for a top-level long lens support, look no further than this tripod.
____________________________________________________________________________________________
Item 5
5. Canon ef 600 f4 IS Mk 1 / ef 600 f4 IS Mk 2 Comparison.
There are many views expressed on the internet by people who have never actually used these lenses.
The following comparison is based on my experience in the field, as opposed to theory and hypothesis.
I have used the Canon 600 Mk 1 lens for four and a half years and I feel, therefore, in a position to assess from experience the pros and cons of this so called super telephoto lens. Super by name and most definitely super by nature; unmistakeably this lens is a top of the range performer!
In terms of optical performance this lens is faultless; it delivers consistently sharp images under all circumstances. The image stabilization works superbly well enabling the lucky user to produce quality images even under the most challenging conditions. This lens is identical in build and design to the Canon 500 Mk 1, they differ only in weight and 100mm focal length. As I outlined in a previous review, this weight difference and the 100mm focal length are both considerable factors. The main reason for buying the 500 was its lighter weight and conversely the main reason for buying the 600 was its extra focal length. This was always the dilemma facing prospective buyers of these lenses.
The 600 Mk 1 weighed a mighty 11.8lbs and I can say from experience that it is a very heavy piece of kit to haul around. Carrying this lens for a mile or so will challenge even the most enthusiastic photoghrapher. With the 500 Mk 1 weighing a meagre 8.5lbs this alone was enough to persuade most people to buy the 500, only people like me, who wanted/needed the extra focal length bought the 600. The only advantage of using the 600 was its longer focal lengh, producing an image that was 44% larger than the 500. (Please see previous review).
However, with the arrival of the new Mk 2 Canon lenses the 600 Mk 2 now weighs in at 8.6lbs, basically the same as the 500 Mk 1. Thus confirming that if you could carry the 500 Mk 1 you can also carry the 600 Mk 2! The 500 Mk 2, however, weighs in at 7lbs a further weight loss of 1.6 lbs, but not as game-changing as the weight loss between the 600’s.
The Mk 2 lenses have really been ‘attacked’ by Canon and the design teams must have worked really hard on this new lens development. In particular the 600 and 400 lenses have achieved dramatic weight loss and to be fair they were in the first place the heaviest in the Canon arsenal. The physical dimensions of either the 600 lenses remains quite close, just a few millimetres either way, so quite insignificant. I didn’t think Canon could have altered the design of the 600 Mk 1 so dramatically. I thought they could reduce the weight slightly because there are always light-weight materials coming onto the market and in all walks of life these materials have made a big difference. How mistaken was I - When the 600 Mk 2 was delivered, I opened the packaging and I thought for a moment the Canon hard case inside was empty! It felt so light, I honestly thought some mistake had been made in the dispatch process. I was somewhat relieved to find that there was in fact a lens in the case and it was indeed the 600 Mk 2. Further was my surprise when I picked the lens up, (after being used to picking up the heavy 600 Mk 1), I found that there was hardly any effort required to pick up this new lens.
Quite frankly I am still in shock over the weight loss!
However, this dramatic weight loss is only the beginning of the new specifications of this totally revamped lens. The weight has now been much more evenly distributed across the lens. Gone is the front heavy problem, where if you tried to hand-hold the Mk 1 all the weight was on your front arm.
• The new lens is not front heavy any longer, this has been achieved by removing the protective front meniscus lens which was obviously very heavy. As a result when you place the Mk 2 lens on a gimbal head plate the plate has to go almost all the way forward to achieve equilibrium, previously with the Mk 1 the plate had to move all the way back. The Mk 1 was always trying to tip forward and care was needed to avoid this problem. To achieve this weight loss the Mk 2 lens is made from a combination of Magnesium and Titanium alloys, very lightweight but importantly, just as robust. The Mk 2 also comes with two lens feet, one for tripod and the other for monopod mounting. This shows that with the 27% weight loss it is now possible to shoot with this lens on a monopod, something that was unthinkable previously.
• The Mk 2 also has new Fluorine coated elements instead of a combination of Fluorine and UD (ultra-low dispersion elements) found on the Mk 1, lighter but better performing.
• Further attention has been paid to the ergonomics of the Mk 2 lens, the auto/manual focus switch is right at the rear of the Mk 2 making it so much easier to reach without hardly moving your fingers - much quicker. On the Mk 1 you had to reach forward to switch between auto and manual focussing.
• There is also a new power focus switch for the movie makers among us, this mode is designed to smooth out the changes in focussing when taking videos, not for me but I am sure very useful.
• Image stabilization is upgraded from two to three modes.
Mode 1, the standard setting, is used for stationary objects.
Mode 2 is used for horizontally moving objects, this mode stabilizes on one axis only.
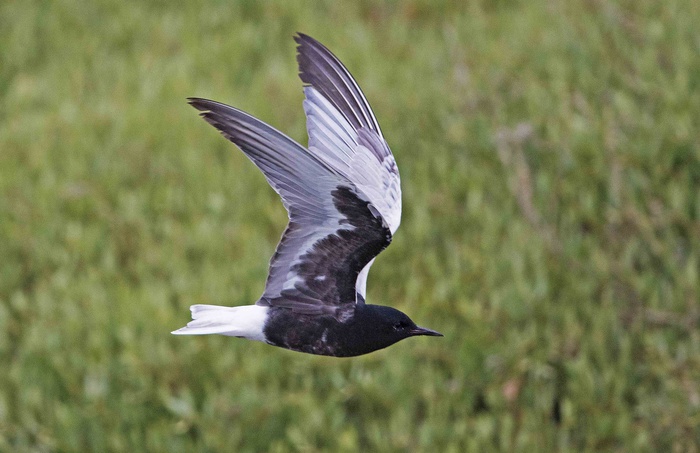
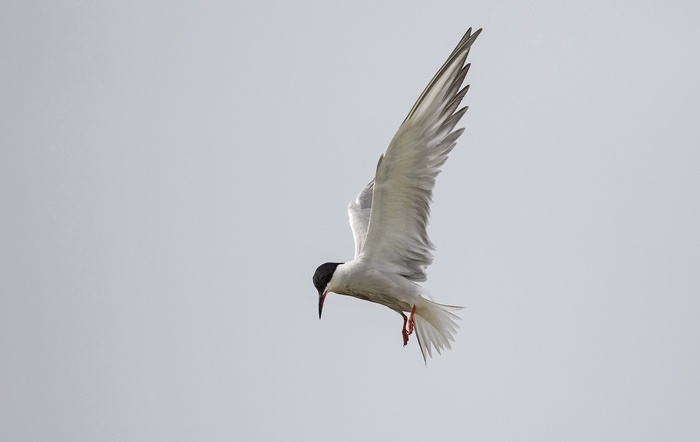
This White Winged Black Tern was captured while handholding the 600mk 2 as the bird flew quickly past.
The new Mode 3 is dedicated for the enhanced tracking of moving objects in the vertical and horizontal positions. With image stabilization not being activated until the precise moment of shutter release, thereby eliminating the user fighting against the image stabilization mechanism when tracking an erratically moving subject.
Mode 3 proved particularly useful when tracking this Common Terns erratic flight pattern right up to its hovering position, I was able to quickly handhold the 600 mk 2 lens without much effort, something that would have been impossible for me to achieve previously with the 600 mk 1.
I waited for the bird to hover and then engaged Mode 3 IS to capture the action as the shutter was released.
• The minimum focussing distance is also now 39.3 inches closer, down from 216.5” to 177.2” another big step forward.
All these new features have catapulted these amazing lenses to the forefront of the super-telephoto bracket.
To summarise the basic differences in physical dimensions between the Canon Mk 1 and Mk 2 600 lenses:
600 Mk 1: Weight = 11.83 lbs : Diameter X Length = 6.6” x 18.0”
600 Mk 2: Weight = 8.65 lbs : Diameter X Length = 6.6” x 17.6”
Notice the lighter paint on the Mk 2.
One annoying problem that has been designed out is the unavoidable wearing of the paint on the barrel of the lens, when the lens hood was mounted onto the Mark i.
On the Mark ii this has been achieved by fitting a hard scratch resistant rubber/plastic type collar onto the lens where the hood is mounted.
To conclude, it might not appear such a quantum leap when looking at these dimensions, but the difference between these two lenses is significant. I can now carry the new lens without effort, before it was becoming an ordeal to carry the 600 Mk 1. (Bearing in mind I am six feet tall, thirteen stone and have led an active life). The new lens can now be carried on an aeroplane as hand luggage, this is a major bonus!! In addition I have also bought the new Canon Mk 3, 1.4 tele-converter which has its own micro-processor which allows it to ‘communicate’ with the new generation of lenses, allowing sharper and quicker focussing. Initial tests have suggested that even with the new 1.4 Mk 3 tele-converter mounted on the 600 Mk 2, the image quality is still superior to the ‘bare’ Canon 800 f5.6. I have always maintained that the 600 f4 was a more useful lens than the 800 f5.6, these recent tests if accepted will, unless it is upgraded, possibly prove the end for the 800 f5.6.
Ostensibly the only dilemma now facing prospective purchasers of either the 500 or 600 Mk 2 is the cost, because the weight question is now virtually irrelevant.
I was and still am a big fan of the Canon 600 Mk 1 and if you are constrained by budget, are fit and relatively young, and you will need to be, it still remains a very good buy.
However, the 600 Mk 2 is on another level in terms of image quality, design and ergonomics. My conclusions, based on the aforementioned technological improvements and also my initial use in the field are that it will take a very special lens indeed to knock the Canon ef600 mk 2 off its lofty pedestal.
____________________________________________________________________________________________
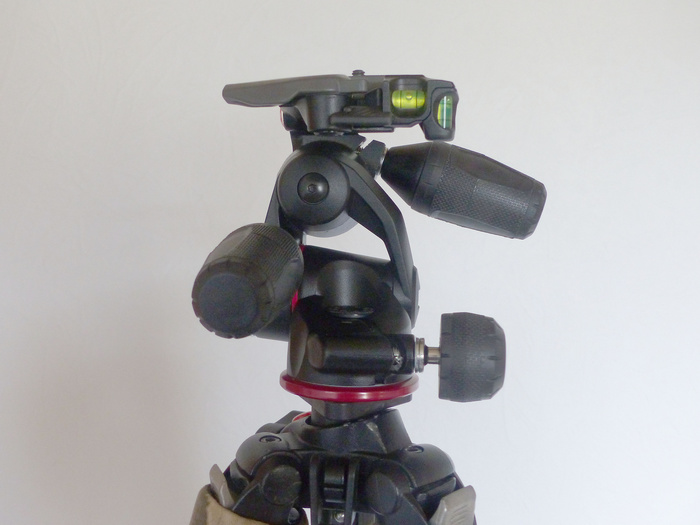
Item 6
6. Manfrotto MHXPRO-3W Tilt and Pan Tripod Head.
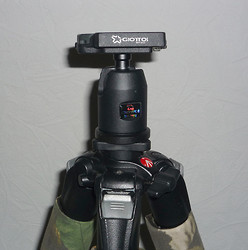
Lately I have experiencing a few irritating problems with my Giottos Ball Head. This head is a perfectly good head for landscape work when a lightweight camera is used. However, I use my trusty Canon 1D MKii camera for this work and it is a heavy piece of kit. When you pick it up it is what it feels like, a pro DSLR and I’m afraid the Giottos Ball Head is beginning to suffer under its weight. When I carry this kit over my shoulder this ball head just keels over letting the camera hit the tripod. I can’t complain really it only cost around £30.00 and is still fully functional but not for the Canon 1D Mk ii and Canon ef 17-40 f4 combo.
Therefore, I began my usual exhaustive search for a replacement and I have been slightly put off Ball Heads because of this problem so I started to look at Tilt and Pan Heads. There is an ongoing discussion about which is the better option between these two types of heads and both sides have valid reasons for their preference and rightly so. However, one thing I will say is that it appears it is necessary to spend more money on a Ball Head than on a Tilt and Pan Head to support the same weight of camera / lens.
This conclusion led me down the Tilt and Pan route;
As I have previously stated I am a big fan of Manfrotto products and I was naturally attracted to their range of heads, but I have to say that I put a limit of £100.00 on what I would pay for a head, so if Manfrotto didn’t have a head in this price range I would have looked elsewhere. I did indeed look at many manufacturers of these heads and there are a myriad of products out there, some cheap and nasty, claiming to be able to support ridiculous weights. With experience you learn to ignore these claims because they just don’t mean anything and you will have wasted your money. Many items are reproduced in India for example and they look the same but unfortunately they definitely don’t perform the same.
I began to dwell on one or two heads and principally the Manfrotto MHXPRO-3W Tilt and Pan Head. This looked a really solid piece of kit and I know from personnel experience after using their 057 series tripod, (review No 4), they know how to make great products. After comparing internet prices I bought this head online from ‘Camera World’, (a high street shop) for £89.00 plus £5.00 next day delivery and I highly recommend them for their pricing and service, first rate!!
I have now taken delivery of the Manfrotto MHXPRO-3W Tilt and Pan Head.
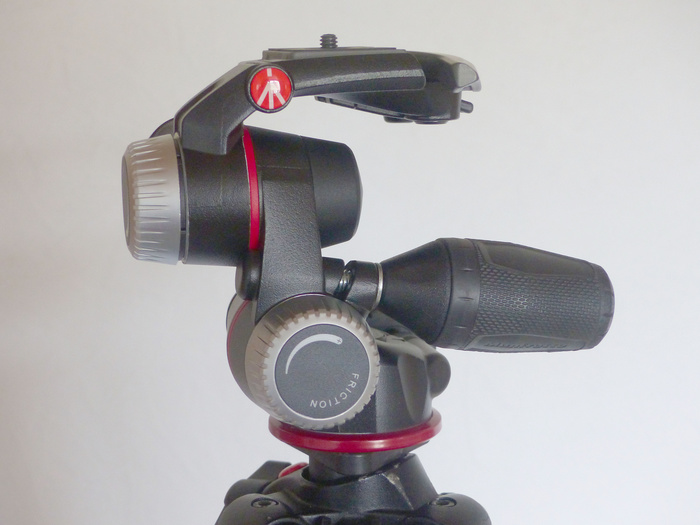
This is a superbly designed and engineered product, weighing in at 1Kg, not light beware!!
This head is 13cms tall and claimed to be able to support 8Kg, this last claim is totally believable, although I won't be using that type of weight it feels fully able to support it!
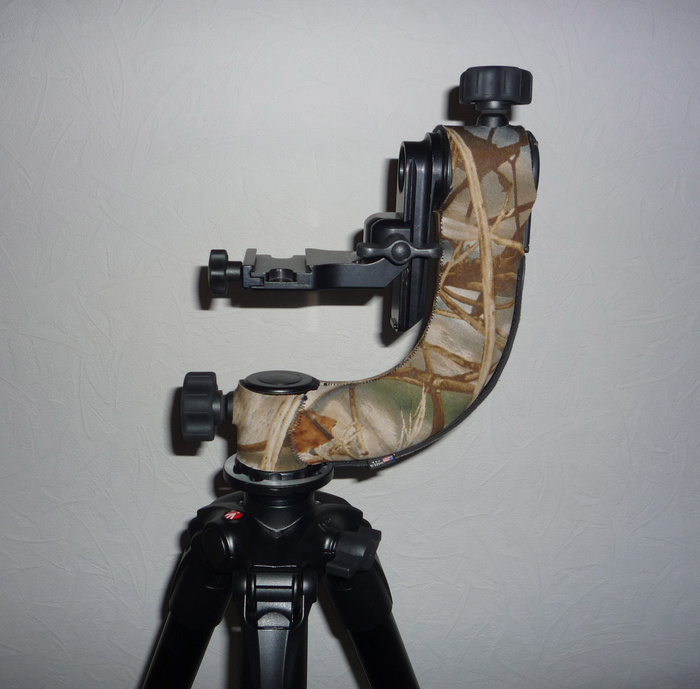
It has three functions, a forward / backward tilt, a sideways tilt and a 360 degree pan. All these movements have an adjustable 'Friction' setting and refreshingly they all work really well. Once your kit is positioned where you want it you just twist the locking levers and everything is rock solid, with some heads they just won't support their claimed weights in an angled position. THIS HEAD WILL!!!
Here it is with the old 'War Horse' on board.
What I really like about this head is the thought that has gone into it, the friction dials have such a finite adjustment, they suit all types of movement. The locking levers have good quality grips and they really do 'Lock Up'.
This head also comes with its dedicated 'Plate', unlike some where you have to buy the plate separately.
These levers are also adjustable in that they push in to save space when not in use.
There are also three spirit levels covering every angle.
All in all this is a truly superb piece of kit, perfect for someone who is interested in Landscape Photography and it looks great as well. I can see this head being a real big seller and I Highly recommend it!!!
____________________________________________________________________________________________
Item 7
7. Hahnel Combi TF Remote Control.
This remote control device is for triggering your camera shutter and/or flash unit from distance. I have a few corded shutter releases which I use for situations where light is in short supply, such as early mornings or late evenings. My latest Kingfisher shots were all triggered using this method, it helps to get sharper images at low shutter speeds by avoiding camera movement. However, there are obvious constraints, principally the length of the cord, typically these range from about 60 up to around 90cms. While these are perfect for shooting from a pop-up hide or just using off a tripod for landscape or macro work, if you want something more, then wireless is the way to go.
If you are not a big fan of wireless devices, I can understand that, but let me assure you this unit really does work.
It is very simple to fit and to use;
There are three components, sender, receiver and cable.
Different cables fit different cameras so just make sure you order the right unit for your camera, eg Canon, Nikon etc. Having said that the two cables they supply fit almost any DSLR camera. Obviously the cable end that fits the receiver is the same so it's only the cable end that fits the camera that could be different and most of them are the same, but do check!
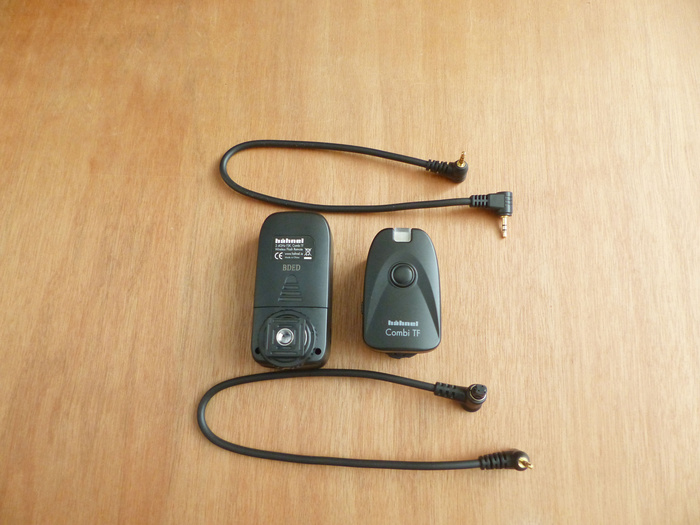
Simply attach the receiver to the ‘Hot-Shoe’ on your camera, tighten the small locking wheel up to maintain a good connection and then plug one end of the lead into the receiver and the other into your camera remote connection. Ensure that the receiver unit is set to position 1 to save battery life then set the sender unit to ‘B’ for camera shutter release. There is also a 4 second delay position on the sender for timed shots. When you press the sender button half way down a green light appears and the lens that is attached to your camera will just focus, fully depress the sender button and your camera shutter will operate at whatever camera setting has been dialled in, ( 10frames /sec ) etc. When your camera or card reaches the buffer the shutter will stop, just as normal.
I have tried this device and up to now it is triggering my camera shutter from 30 metres with no problems. It is claimed it will be effective up to 100 metres.
Probably at high ranges there would be a delay in the signal but at thirty metres, (my first test), there is no time lag and I think this will be a very useful device.
Imagine if you regularly saw a Barn Owl perching on a favoured post. Set your camera up, (even with a short focal length lens), on a tripod, fit this device and hide up to 100 metres away. I think it would be best to focus the lens first then set it to manual focus to avoid any hunting. Wait for the Owl to perch and then trigger the camera shutter, (Boom), Gotcha!!
These units normally retail for between £35 and £45, but I picked one up (new) on ebay for £20. Sender, Receiver, two leads, batteries and instructions. You can also trigger a flash unit which fits on top of the receiver via its own Hot-Shoe and extra receivers can also be bought to trigger more flashes that can be fitted onto other tripods via their own standard tripod fitting.
I can highly recommend this unit, it does what is says on the tin!
____________________________________________________________________________________________
Item 8
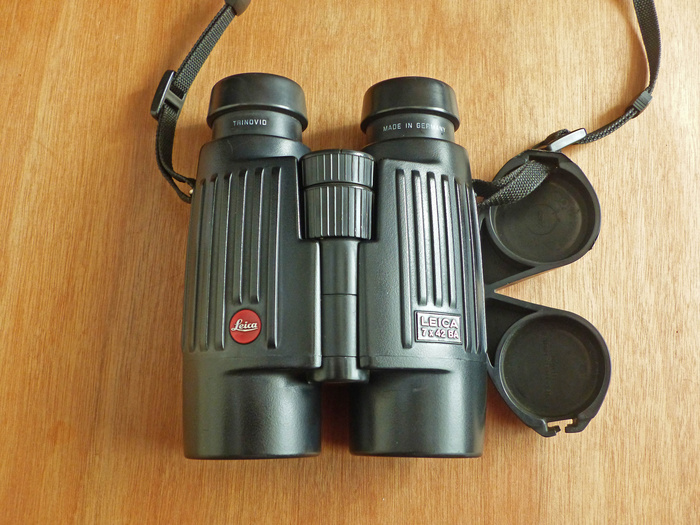
8. Vortex Razor 10 x 42 HD Binoculars.
I have been contemplating buying new binoculars for about a year now, it has taken this amount of time for two reasons; they are a considerable amount of money and also they will be the last binoculars I will buy. Binoculars should last a very long time if you buy quality and I always buy quality optics, there is no compromise for me. Therefore, while I was away in Norfolk a couple of weeks ago I visited a retailer on the north Norfolk coast to try some binoculars first hand. Norfolk is one place where you can get your hands on equipment before you buy. Never buy binoculars without trying them first and try them thoroughly! It’s one thing to buy a lens on-line, you know what you are buying, I bought a Canon Ef600 f4 is ii lens online but I knew what I was getting, it’s different. With binoculars one person may like a brand and another might not, it’s how they feel and appear in your hands.
I have used a pair of Leica Trinovid 7 x 42 BA binoculars for over twenty years and they have travelled the world with me and have been faultless. There has never been one instance where they have not performed flawlessly; this is testament to their German engineering. However, although my eyes are still very good, they are not quite as good as they used to be. This is what made my mind up to change. I bought 7 x 42’s back then because I used to carry a telescope everywhere with me and if I needed more magnification then I used that. Now carrying camera kit I cannot carry a telescope as well, although I have the telescope in the boot of my car if really needed. I had to admit I needed more magnification and that meant going from x7 to x10 it wasn’t worth just going to x8 it wasn’t enough.
I set a limit of a thousand pounds for a pair of binoculars, bearing in mind I was buying two pairs one for my wife who had the same problem with magnification. I initially made my mind up to stick with Leica, tried and tested over twenty odd years, however, before I went to Norfolk I read a number of binocular reviews and one name kept cropping up, Vortex! An American company and they were having excellent reviews, it was being said that the image quality and build were as good as any out there.
I phoned up a relatively new company trading in Burnham Deepdale in North Norfolk by the name of The One Stop Nature Shop. This shop is run by two friends who have gone into business, they are both really nice people and are nature enthusiasts and who both use Vortex binoculars. They even offered me the opportunity to take the binoculars out onto the marsh to try before making any decisions. I declined that offer but I wanted to try the new Leica Trinovid HD 10 x 42 and the Vortex Razor HD 10 x 42 binoculars extensively.

As soon as I looked through the Vortex Razor 10 x 42 HD I was hugely impressed, there was a real pop to the image with a lovely ‘walk in’ feel. The Leicas just didn’t have it, and I was shocked, I expected more! Although the Leicas were about £150.00 cheaper what mattered to me was the image just wasn’t there. I asked my wife what she thought and she had exactly the same views. We bought two pairs there and then and we are both hugely impressed by these binoculars.
I have no doubt the Leicas HD Trinovids were superbly built and would see my birding days out. However, in reviews it was being concluded that the image seen through the new Leica HD Trinovids was for most people just about as good as the Leica Ultravids which retail for about £1450.00. If that is the case then the Vortex Razors are even better value.
To conclude, here are some facts and figures outlining the differences between my Leica 7 x 42 and my new Vortex Razor HD 10 x 42 binoculars.
This is not a comparison - that would be unfair- after all there’s twenty years of technology between them. A fair comparison would be between the new Leica Trinovid HD and the Vortex Razor HD and I have made my feelings clear on that above. The new Leica Trinovid HD binoculars were also lightweight and had good minimum focussing and field of view but the image quality went to the Vortex Razors HD.
Vortex Razor HD 10 x 42.
Min. Focus Dist. 6ft
Weight 24.8oz
F.O.V. 362/1000yds
Leica Trinovid 7 x 42 BA.
Min. Focus Dist. 20ft
Weight 32oz
F.O.V. 420/1000yds.
The FOV of the Razors is very good for a x10 magnification binocular, a x7 binocular is always going to be wider.
Only the very best quality components are used to construct the Razors, hence Vortex's confidence in their gaurentee.
The Razors are rubber armoured and are made from magnesium, giving them a lightweight but very robust feel. They have a really classy design which looks great. They have multi-coated lenses which show a very clear bright image even in fading light - impressive, there is no colour fringing that I can see. They also have phase corrected coatings to combat ‘phase shift’ a problem common with lower quality roof prism binoculars due to light waves reflecting off the opposite end of the prisms causing slight loss in image sharpness.
The Razors have twist-up eyecups which click in three positions and are the best I have tried and the eye piece diopter once adjusted is lockable. They also have a rain-guard that fits on the neck strap and objective lens covers that are held on the binocular barrels with quality rubber rings.
The Razors come with a high quality neck strap and case, (Leica neck strap and cases are pathetic and everybody has always moaned about them).
Mentioned above the Vortex VIP guarantee is the best out there, it is a no quibble lifetime warranty, irrespective of ownership, no registration required. Basically unless you reverse over them with your car or get them stolen they will repair or replace them free of charge. If you drop them and damage them – no problem you are covered.
Read up on it, it is the best out there!
I will keep my Leicas I can’t part with them for the going rate of about £300, they will be my trustworthy back-up binocular. However, for weight reduction, Min. focussing distance and improvement in image quality I chose the Razors.
The Vortex Razor 10 x 42 HD binoculars retail for around £1000 and if you are not a 'brand hound' and you get the chance to look through these binoculars, take it-you might be surprised!
____________________________________________________________________________________________
Item 9
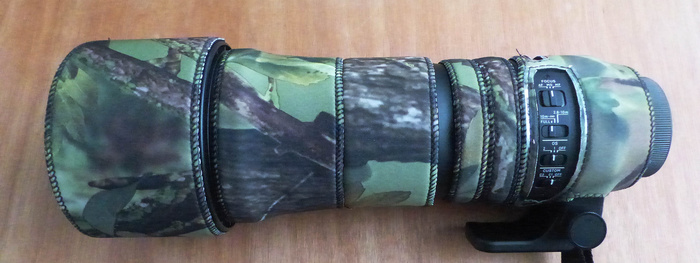
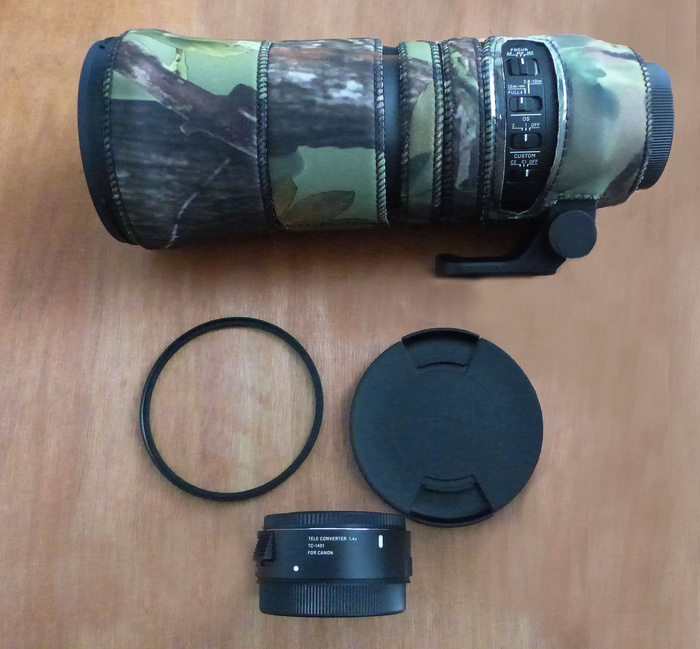
9. Sigma 150-600 f5-6.3 OS Zoom Lens.
I have been looking for a good quality ‘walk-around’ telephoto lens for some time and there have been plenty of lenses to consider in the Canon range;
Canon’s 400 f5.6, 400 f4 DO, 300 f2.8 etc.
The 400 f5.6, although very good for flight shots, lacks IS and is a bit short on focal length and adding a x1.4 tele converter only takes it to 560 @ f8.
The 400 f4 DO is far too expensive to just use for walking around, it retails at around £7,000 and is also too short on focal length. It will work well with a x1.4 tele converter again reaching 560 and at a useable f5.6, but the cost is far too much for a second lens.
The Canon 300 f2.8 is also very expensive at around £6,000 and is quite heavy, again it is short on focal length; the bare lens is exceptionally sharp but it needs a x2 tele converter to get to a reasonable focal length – 600 @ f5.6. These x2 converters are not a good option for increasing focal length. On almost all lenses they degrade image quality badly and slow the lens auto focus dramatically.
I have had a Canon 300 f4 is lens for ten years and it is a very sharp lens, a sort of poor man’s 300 f2.8. I have taken some great shots with it using a x 1.4 converter, getting to 420 @ f5.6, but the same old problem was there, lack of focal length!!
However, there now appears to be a solution to this historical conundrum and it takes the form of the Sigma 150-600 f5-6.3 OS zoom lenses.
Sigma know how to produce zoom lenses, take the legendary 300-800 f5.6 (Sigmonster). A great lens but at 13lbs in weight, far too heavy for almost everyone. This lens is a very good performer but not as sharp as the equivalent focal length Canon 800 5.6 prime. I always prefer prime lenses to zooms but a prime lens with a long focal length as a walk around lens tends to be very expensive and quite unwieldy.
Therefore, I arrive back to a walk-around zoom lens;
The Sigma 150-600 f5-6.3 OS zoom lenses, (Contemporary and Sports), have had very good write-ups and have indeed been producing very good images. The sports version has the better build quality using more metal, (hood and body) and also has weather sealing, however, the image quality between the two is virtually identical. The Sports version is about £500 more expensive and is much bigger and heavier, at 6.3lbs not really a carry around lens. Only just over two pounds lighter than my Canon Ef600 f4 is ii lens!!
When I was watching some Waxwings locally during this winter’s irruption a friend of mine was using the Contemporary version of this lens. It was a golden opportunity for me to get a hands-on appraisal. When I held the lens I was impressed with how light it was, (it has essentially a composite shell), but it felt very well-built. It also focussed quickly and zoomed easily. I knew the images it produced were of a good quality and also the results with the x 1.4 tele converter were also good, (although autofocus will be a lot slower using the TC1401), I decided to buy both straight away.
N.B. Using the (Sigma x 1.4 tele converter TC1401) with both the Contemporary and Sports versions of this lens;
Adding this tele converter to either of these lenses makes them an f9 lens and they will only autofocus, (using the shutter button), with Canon Series 1 Camera Bodies and top end 1.6 cropped bodies like the Canon 7D ii., which retain autofocus at f8. NB. Although the camera aperture shows f9 when the tele converter is used it is obviously fooling the camera's autofocus system into believing it's only f8 thereby retaining autofocus.
I cannot comment on Nikon bodies having had no experience with them.
(Please check before purchasing the TC1401).
I ordered the Contemporary version of this lens with the x1.4 tele converter from Wex Photographic for £849.00. They arrived two days later bang on time from this top flight retailer. They might be a bit more expensive from Wex but the service and back-up they provide is second to none! I have also taken delivery of a lens coat and a Schott glass UV filter, to protect the lens from accidental damage to the body and glass.
N.B. Buying a filter for the front element of this lens;
95mm filters can be expensive, (even UV or Daylight), they can retail at well over a hundred pounds! There are cheaper versions on the market but they tend to be made from resin rather than glass and they will not be useable, producing blurred images, especially at the ‘long end’ of the zoom. Many people have had this problem, not realising until it was too late. However, with this in mind I saw a 95mm UV filter made by Schott glass advertised on Amazon. It was £20 and I thought it was worth a try because Schott make the glass for Zeiss and that told me all I wanted to know. After trials with this filter using a tripod and cable release I can confirm that there is no discernable difference in image quality between the bare and filtered lens.
Specifications;
Contemporary.
Weight = 1.93Kg
Dimensions = 105x260mm
MFD = 2.88M
Filter = 95mm
Sports.
Weight. = 2.86Kg
Dimensions = 121x290mm
MFD = 2.60M
Filter = 105mm
To summarise the Contemporary lens;
Splash and dust protection only.
OS (Optical Stabilization) equivalent to 4 stops of light.
OS mode 1 for general use.
OS mode 2 for horizontal panning.
Focus limiter switch.
2.8 – 10 Metres.
10 Metres to infinity.
Full.
Three position focus switch;
i. Auto Focus.
ii. Manual Focus.
iii. Manual focus override.
Zoom lock switch, (to combat lens creep when carrying).
Custom Switch for programming different focussing and stabilization parameters in conjunction with the Sigma Dock. The dock is also used for updating firmware etc.
Plastic lens hood.
Good quality soft case.
Case and Lens straps.
Removable lens foot, (1/4” thread, with replacement plastic ring to cover the lens body after the foot removal).
There is very little Chromatic Aberration visible through this lens.
When closed down 1 or 2 stops this lens is quite sharp throughout its range.
As mentioned previously, when this lens is coupled with the dedicated (Sigma TC1401) tele converter, autofocus is achieved using a Canon 7Dii. However, the autofocus is drastically slowed down on cloudy days and this tele converter is only really usable on bright days, (something to consider)!!
This combination gives an effective focal length of 1344mm @f8.
600 x 1.4 x 1.6 = 1344mm.
I can highly recommend this lens to anybody wishing to take up wildlife photography on a budget.
It is ideally used on a monopod or hand held.
It is recommended that you turn off the OS when this lens is tripod mounted.
However, this lens can’t be used like a professionally built lens, (exposed to bad weather and thrown around). The manual focussing ring is far too small and is difficult to use and the lens hood is cheap and nasty. However, these are quite small gripes, so basically, if you aren't bothered by these things and you look after your lenses as I do then there won’t be a problem. This lens will never achieve the image quality of my Canon ef600 f4 is ii lens but I can't carry the Canon all day in a small back pack!!
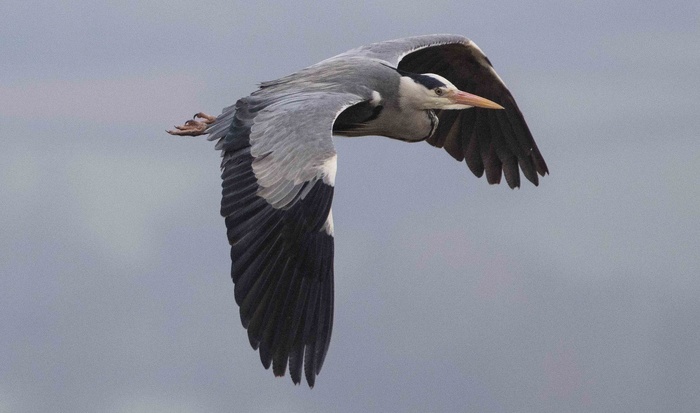
Grey Heron ; Canon 7D ii + Sigma 150-600 Contemporary f5-6.3, (handheld - 531mm @ f7.1 - 1250/sec)
Schott 95mm UV filter attached. (See above re filter).
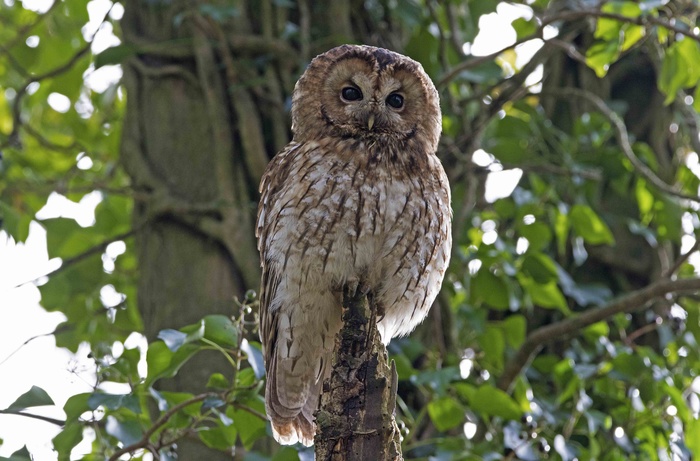
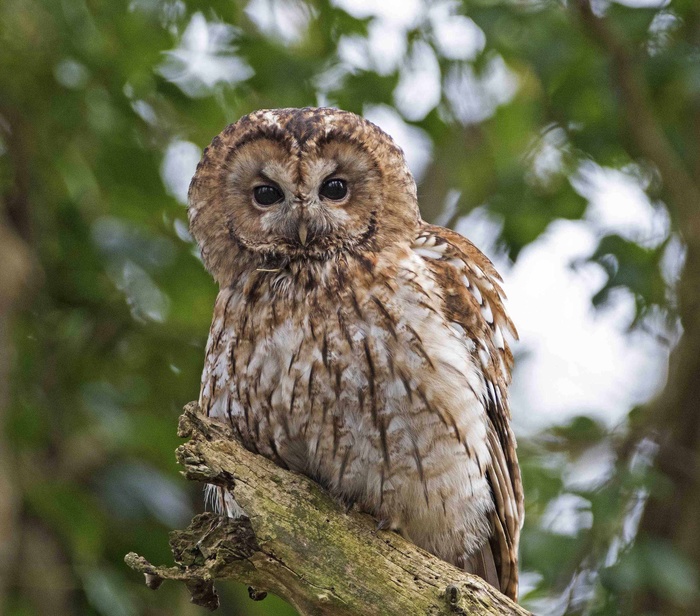
Tawny Owl ; Canon 7D ii + Sigma 150-600 Contemporary f5-6.3, (handheld - 435mm @f6.3 -250/sec)
Schott 95mm UV filter attached. (See above re filter).
__________________________________________________________________________________________
Item 10
10. XIKEZAN 12mp / 1080 p Trail Camera.
I have been interested in finding out what wildlife is frequenting my garden during the night and also during the days when I am not around.
In order to find out I bought a Trail Camera, nothing too expensive, just something basic to get a few images that you can’t get under normal circumstances.
I’ve purchased a XIKEZAN Trail Camera from Amazon for £59.99 and also a 16 GB SDHC card to store the images for £8.00. There are some of these cameras that retail for up to £250.00 and I’m sure they are brilliant but I didn’t need that level of sophistication.
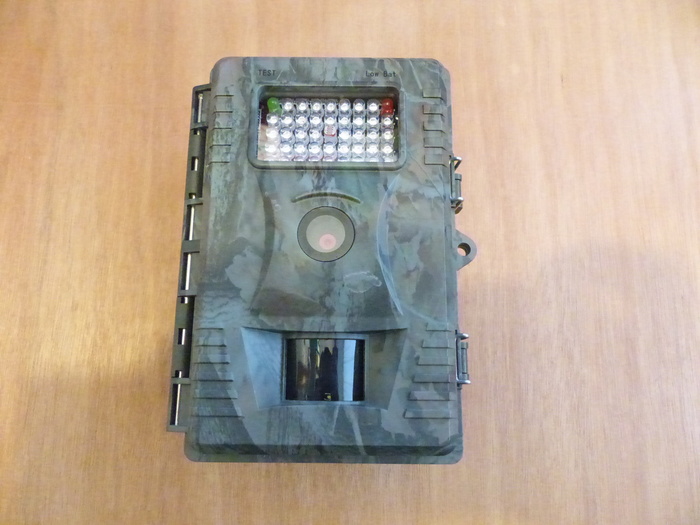
This little unit has an adjustable 8 / 12mp camera for still shots producing colour jpeg images. This feature can be set from 1 – 5 frames when the camera is activated by something. So if the camera is triggered it reacts in about 1 sec and takes 1 – 5 frames whichever is selected.
The unit is triggered by a PIR unit, similar to security lights and has a range of up to fifteen metres.
This unit also takes videos from 1080p / 720p depending on whether you select high or low resolution, the same applies to the jpeg images. The videos last for twenty seconds and then the unit goes to sleep and is then re-activated after either 1, 5, 10 or 20 minutes, which can be set by you, the video format is the standard AV1. Video footage in darkness is obviously black and white and is triggered by an infra-red sensor.
The unit is powered by AA batteries, use four for normal everyday use but it takes twelve for long usage, up to a year.
All images are time and date stamped.
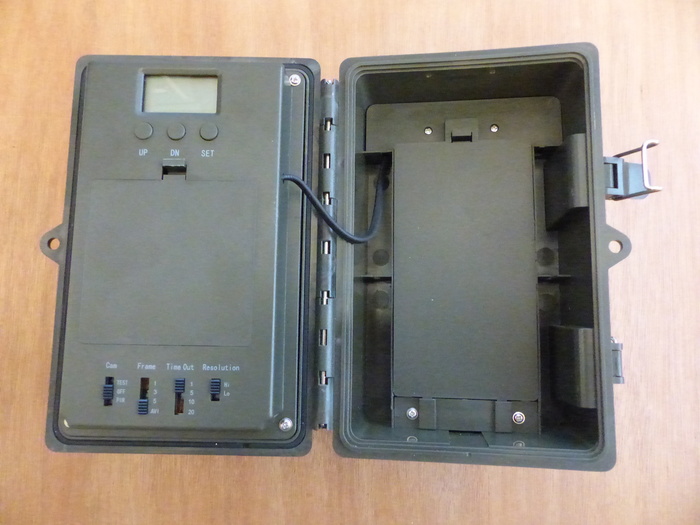
It is very easy to set-up;
i Choose your location.
ii Set the unit to test and pass your hand over the sensor to see if it flashes.
iii Switch to the off position and then to PIR for videos and close up the unit and just wait and see what comes along, it couldn’t be simpler.
There is a dim glow from the infra-red sensor in darkness but nothing during daylight sensing.
It is waterproof and a webbing strap is provided for fixing around tree trunks.
Although it is waterproof I have built a small wooded enclosure, like a small nest box, to offer some protection in bad weather.
I have been very pleased with the results and these trail cameras can provide lots of interesting information on the behaviour of secretive wildlife.
I can recommend this basic trail camera it does all that the manufacturers claim.
Please see links below.
https://youtu.be/SOI0OUVctDE
https://www.youtube.com/watch?v=5-U9IEQZUcI
https://www.youtube.com/watch?v=OmA_kGydhOk
Item 11
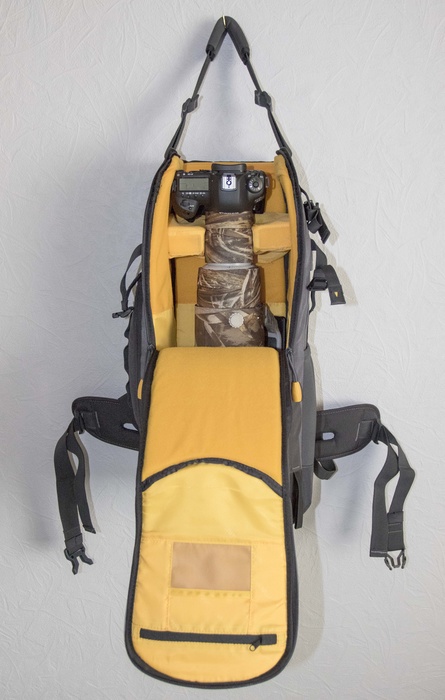
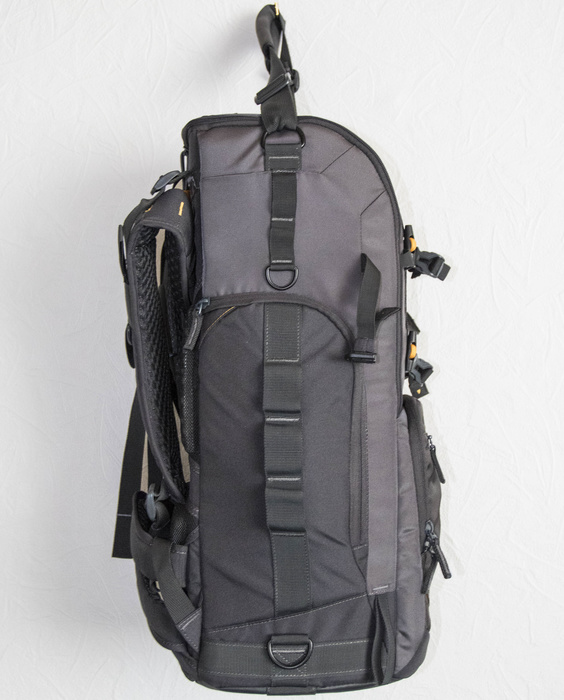
11. Vanguard Alta Sky 66 Long Lens Backpack.
Lately I have been having trouble with my Lowepro AW600 Lens Trekker backpack. The main zip has come away from the bag's material, which in effect renders the bag useless. I took it to a branch of Timsons in Brecon and they put a new zip in but it is far too stiff to use, (for me at least), I like to open and close a bag smoothly. In fairness to them they refunded me fully and I can only praise them for their efforts.
Over the years I have found the aforementioned Lowepro bag perfectly adequate and it has served me well, my only gripe was that the lens I was carrying moved around in the bag when I was walking.
In order to fit a Canon ef600 f4 Mk ii lens + 1.4 Canon converter + 7D Mk ii DSLR + a padded lens hood, (fitted), all sitting on top of a neoprene camo lens cover I had to remove the bottom padded shelf from the bag. This still left some padding from the bag plus the padding from the hood and rain cover. This was a small price to pay for having the lens and DSLR ready to use straight out of the bag. (This combo involves having the Canon 600 lens hood reversed).
If you didn’t carry a waterproof cover and if you didn’t have a 1.4 converter attached to the lens, then all the bag’s padding could be left in situ. If you were using e.g. a Canon ef500 f4 you could fit all the above combo and the padding with ease.
However, I’m not one to stand still and if new products catch my eye then I will investigate them. Having said that I don’t change just for the sake of changing. It was obvious that I had to get another bag and soon – up until recently the Lowepro was the only alternative, nothing else was big enough to carry a 600 f4 lens. However, there are now other manufacturers of these bags on the market, and understandably so because there are a lot of long lenses around these days and a lot of business to do.
One manufacturer that caught my eye was ‘Vanguard’, they have been around for quite a while and make a large range of good quality bags. After my usual exhaustive research, involving measuring external and more importantly internal dimensions very accurately – it’s no good buying a bag and finding that your gear won’t fit in the way you want it to – never go on other peoples findings based on their gear!!
I ordered the Vanguard Alta Sky 66 backpack from Mifsuds in Devon.

The bag was on offer for £178 so I took advantage of this price. However, many retailers had a promotion that was live until the end of December 2018 and this involved buying the bag for about £215 and applying for a £50 cash - back from Vanguard, bringing the price down, if successful, to £165. I couldn’t be bothered applying for this deal for the sake of £13 and it would take about ten weeks to fulfil – not worth it!!
In see that these Vanguard bags are currently retailing for just over £200 the Lowepro bags are around £230.
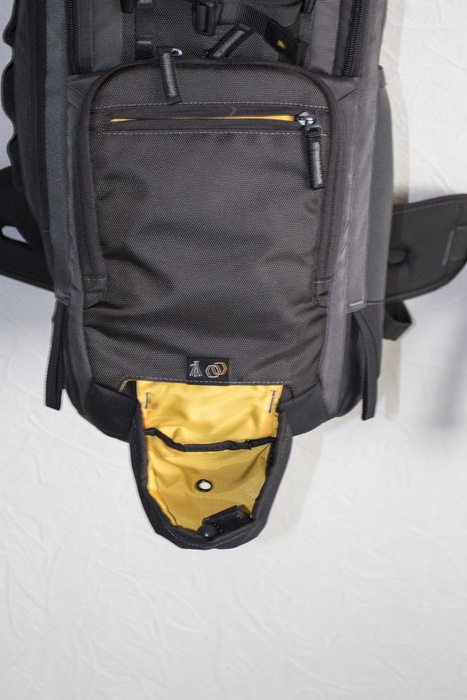
I received the bag before Xmas 2018 and I am very impressed with the standard of manufacture. It is slightly smaller than the Lowepro but this means that the lens is held more tightly when I am walking - I like this! But as a consequence of this the 600 lens takes slightly more time to remove from the bag but with practice it is easy. With a 500 f4 for example it would be less tight and therefore quicker to remove the lens. There is one modification I have had to make and I knew I would have to do this because during my research I read that the sponge collar that holds the lens in place was not suitable, the recess in the collar was too small. This means that a 600 f4 lens barrel, (where the camera is mounted to the lens), would not fit into the ‘U’ shaped collar. To overcome this minor problem I opened up the nylon cover that the sponge collar is in and cut a bigger recess in the sponge with a Stanley knife. Then just put the sponge back in to the nylon cover and refitted it back into the bag, it is held onto the bag by Velcro as in all these bags – easy! It now holds the 600f 4 lens perfectly.
This Vanguard bag has more pockets than the Lowepro but they do not hold bulky items and the Lowepro front pocket is bigger.
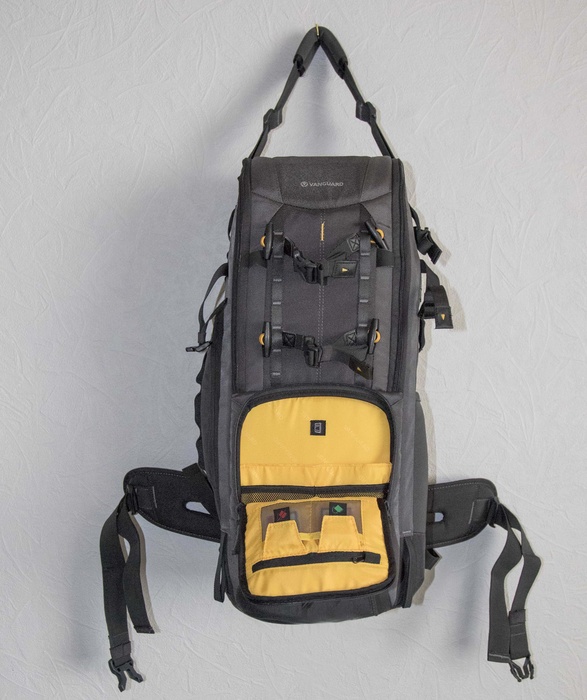
I suppose this has been done in the name of streamlining and I prefer this. The Vanguard bag is supposed to hold a ‘Tablet’ in the main pocket, Apple or such like but that was not an influence on me when I researched the bag. As well as the obvious Lens and Camera I only carry spare cards, a small bag to put a 1.4 converter in when not in use and a remote shutter release. With this Vanguard bag there are two side pockets that the Lowepro doesn’t have, one zipped and the other just elasticated.
The elasticated pocket is handy for carrying a flask/sandwiches.

The zipped pocket is more secure for car keys, mobile phone etc. etc.
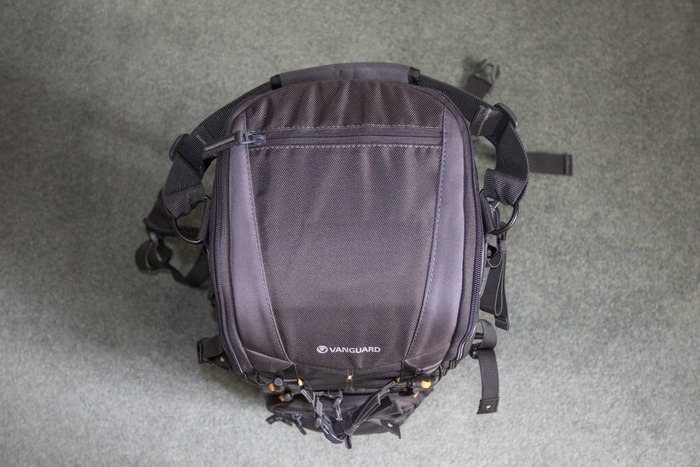
There is also another small pocket on the top of the bag.
The Vanguard also has a fold-away reinforced tripod foot holder.
When a tripod is fixed to the front of the bag via two adjustable straps, the tripod’s feet are placed into this holder stopping it from slipping down. With the Lowepro there is a heavy duty collar fixed to the side of the bag that does the same job, however, I prefer my tripod to be centre mounted like on the Vanguard, because when side mounted as on the Lowepro the tripod swings around badly.
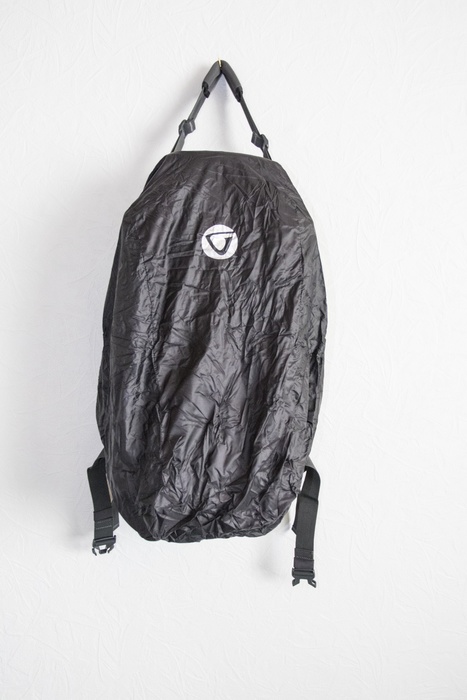
As in all these bags there is a fold-away rain cover.
In summation the Vanguard Alta Sky 66 backpack is very well made with quality materials, smooth zips, and well-designed pockets. The Vanguard bag’s padding around the ‘carrying areas’ i.e. where the bag is in contact with the person is superb and in this aspect it is definitely superior to the Lowepro.
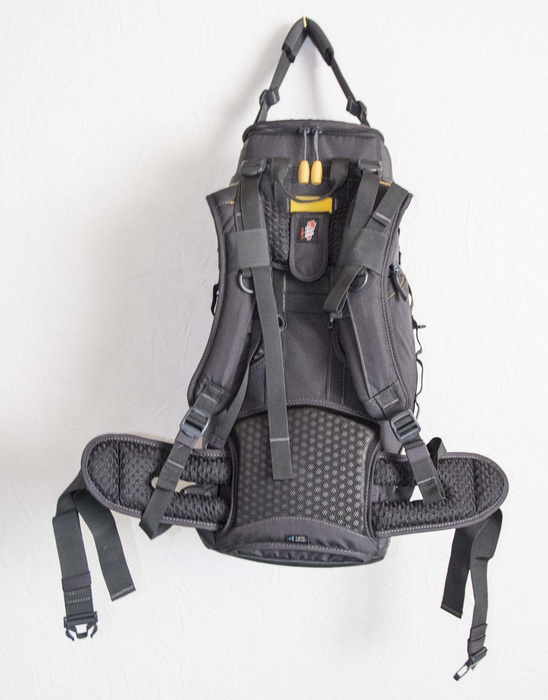
The main back straps are also adjustable to suit different statures. Vanguard claim that you will be more comfortable carrying this bag than other similar back-packs and I have to say that, (based on my experience), it is indeed far more comfortable than my Lowepro.
The interior of the bag is a bright yellow/orange – not sure about this, but it is supposed to make it easier to find small items in low light.

The toggles are also bright yellow, and I get this more than the interior, because they are more visible and therefore easier to locate in low light.
In conclusion, if you want to carry a Canon ef600 f4 Mk ii lens and DSLR in comfort then I can highly recommend the Vanguard Alta Sky 66 back-pack.
Item 12
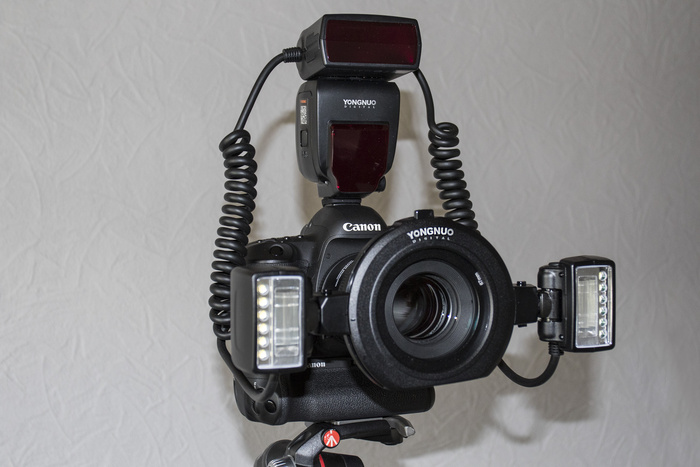
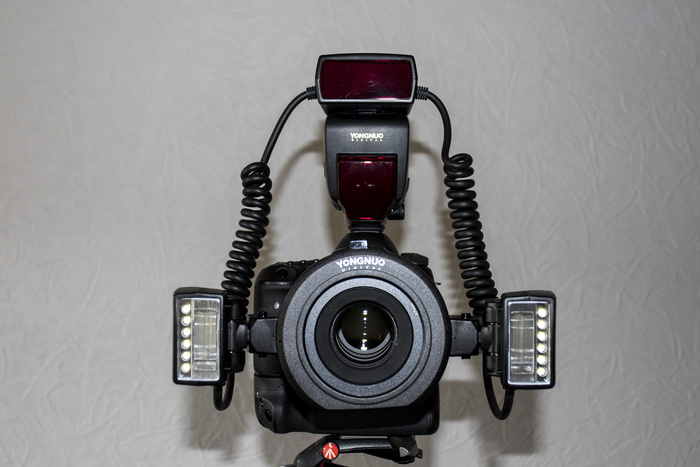
12. Canon EF 100 f2.8 L IS USM Macro Lens and Yongnuo YN24EX Twin Macro Flash
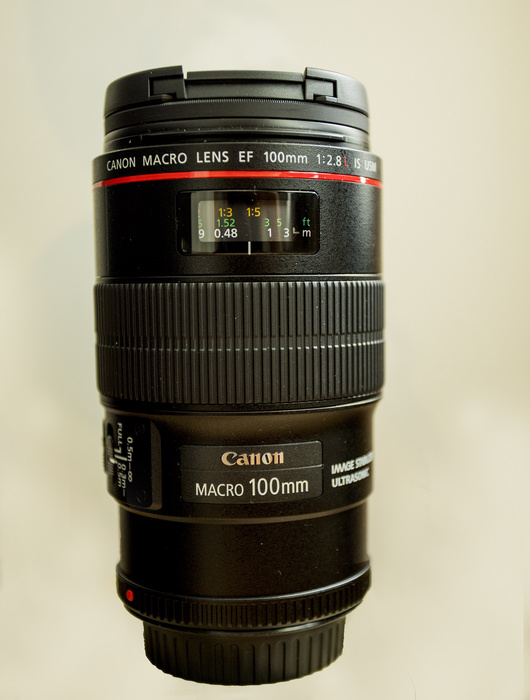
I’ve been thinking about buying a macro lens for some time. After some deliberation I decided to buy Canon - as usual, I like lenses that are compatible with my cameras because it just makes things easier. I bought a Canon EF100 f2.8 L IS USM Macro lens – a tried and tested performer.
With an aperture of f2.8 there is a shallow depth of field with this lens and this coupled with nine rounded aperture blades produces a very nice creamy ‘Bokeh’. I also wanted a lens I could hand hold, therefore image stabilization was necessary. I did think about the Canon EF180 f3.5 lens but it is much more expensive, heavier, has no IS and apparently is very slow to focus.
I have no intention of becoming a serious macro photographer I just want to add another string to my bow. It’s also a type of photography that can be done at home if necessary. It must be made clear that this lens is not made of metal as other ‘L’ series lenses are, it is made of ‘Engineering Plastic’ apparently quite strong and to be fair it feels very well built. However, the lens mount and the focussing ring are made of aluminium. This makes the lens very light for hand holding which is what I wanted – I am not going to be carrying a tripod around to try and photograph insects!
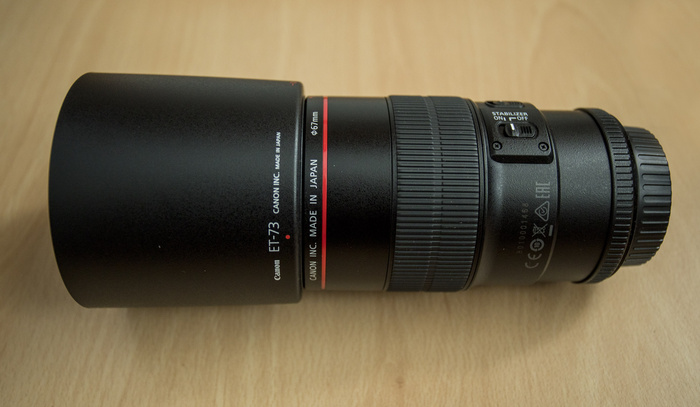
The lens has a hood for use on sunny days limiting lens flare.
True macro lenses magnify images on a 1:1 ratio, this means that the image depicted on your sensor is the subject’s actual size. Therefore, if your have filled the frame, when you enlarge for example to 10x8 then the subject will still fill the size of the 10x8. This then shows huge detail in the subject you have photographed. This is however, the time you will notice that depth of field can be a real monster and even as little as a millimetre will render parts of your images out of focus. You can focus stack in Photoshop but that only works with static subjects or you can pick which part of your image you want to be in focus, the choice is yours. This is not easy, but a challenge is good!
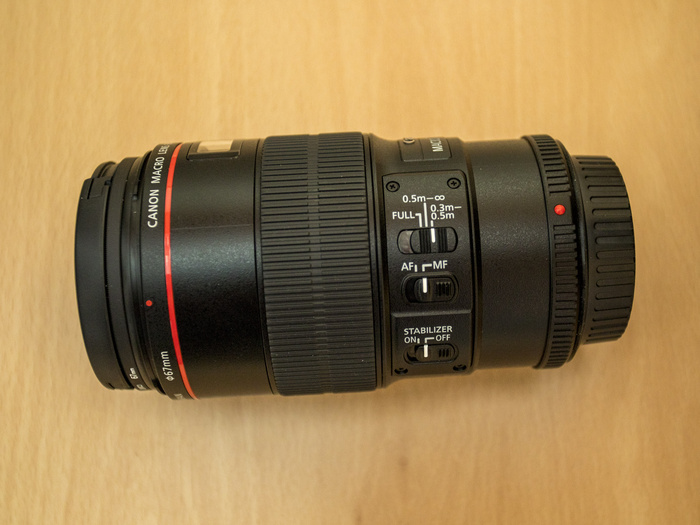
This lens weighs in at 625 grams or 1lb 6oz in old money, the filter thread is 67mm – not too big, so filters, if needed, are not expensive. The lens’s minimum focussing distance is 0.3 metres with a three position limiter switch. This limiter switch allows the lens to focus, (on auto), from 0.3 to 0.5 M – from 0.5M – infinity or full. The USM focussing motor is virtually silent and is very quick and accurate. It also has full time manual focus which is the best way to focus for macro anyway.
This lens is also weather sealed should you be out in unfavourable conditions. The new Canon ‘Hybrid’ IS system corrects angular movement and also shift, (up and down). Canon claims this gives an effective 4 stops of image stabilization, e.g. you would need a shutter speed of 1/100 sec with no IS and 1/5 sec with IS – I’ll see on that one, we are all different and some people are steadier than others. Extension tubes can be added to get closer to your subject magnifying your image by 1.17 for a 12mm and 1.37 for a 25mm tube. It is possible to focus very close to a subject using these tubes but obviously the subject has to tolerate this proximity. However, for inanimate subjects it is great for seeing huge detail, never seen before for most of us. In addition to macro this lens is also a very good portrait lens. On a full frame camera there is slight vignetting at f2.8 but this all but disappears at f4 and on a crop sensor camera it obviously doesn’t exist at all. It is sharp wide open from corner to corner and you would expect this from a macro lens.
I find hand holding this lens very comfortable and most people could walk around with it attached to an average camera body with little effort. If this combination were attached to a tripod there would be no need for a lens collar because of its light weight and the camera body could be mounted straight onto the tripod, and these tripod collars, for what they are, come in at an outrageous price.
Because insects, dragonflies in particular, are the least active in the very early morning before they have had time to warm up, this is the best time to approach them. However, frustratingly this is when there is usually low levels of light. This photography game is not easy!!
Therefore, in an attempt to overcome this problem I realised flash would have to be used to get well lit sharp images. In order to get said half decent images of small subjects in sometimes awkward lighting conditions I also bought a twin macro flash.
Natural light is always best but sometimes it’s in short supply and you have to compensate.
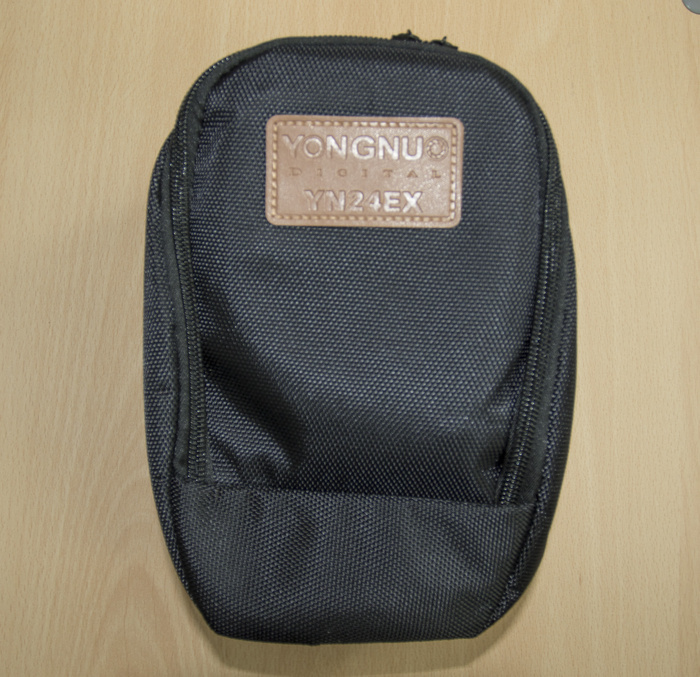
The Canon Speedlight twin macro flash unit is outrageously priced at around £950.00, absolutely ridiculous!! There is no way I or anybody else with a modicum of common sense should pay this exorbitant price. Therefore, I bought a Yongnuo YN24EX twin macro flash on ebay uk for £170.00.
This is a very well made unit and does exactly the same job as the Canon for a fifth of the price.
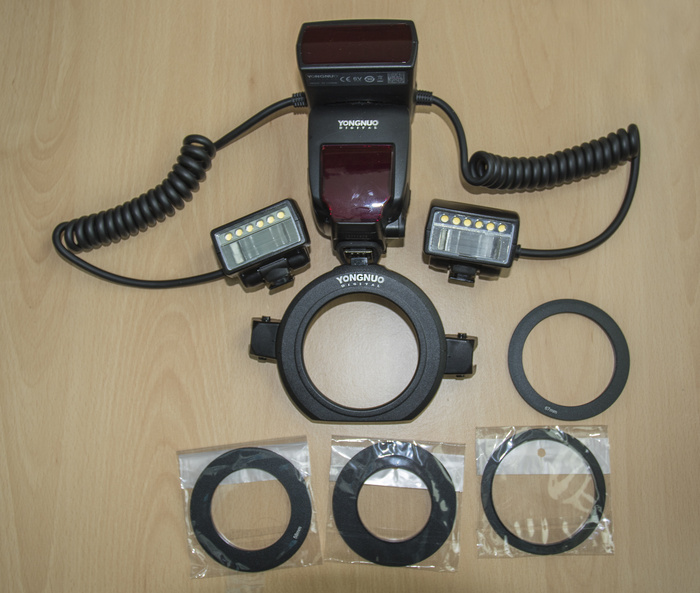
It comes with four adaptor rings; 52 / 58 / 67 / 72 mm. The unit weighs 870 grams or 30 oz. this increases the weight of the photographic package and this needs to be considered – please do your own maths for your respective combos. Bearing in mind this unit will only be used when natural light is in short supply.
Power is supplied by 4 X AA batteries.
This unit is mounted onto the front of your lens by first screwing the appropriate adaptor ring onto the filter thread of your lens. Then the main unit fits onto the camera hot shoe like a conventional flash unit. The circular mounting ring is then clipped onto the adaptor ring and finally the twin flash units are clipped into place.
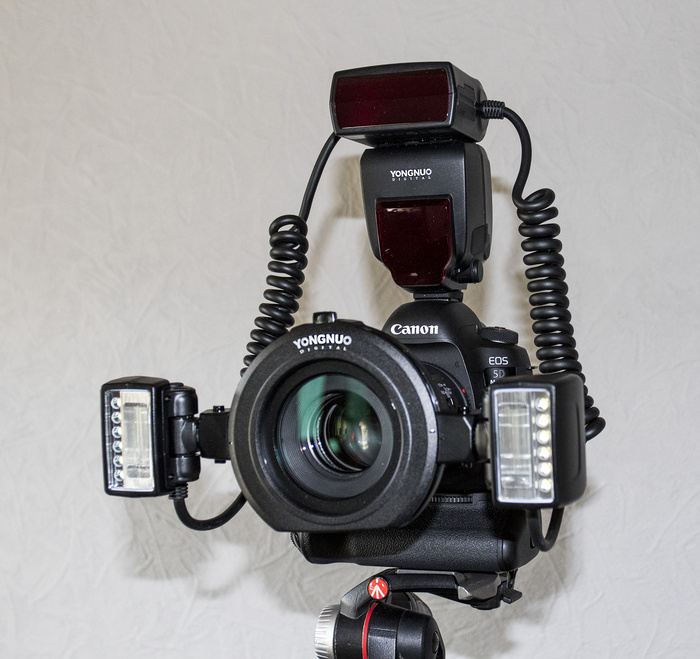
These twin flash units can be moved around the mounting ring circumference and also on their own axis to make the light more diffused if required.
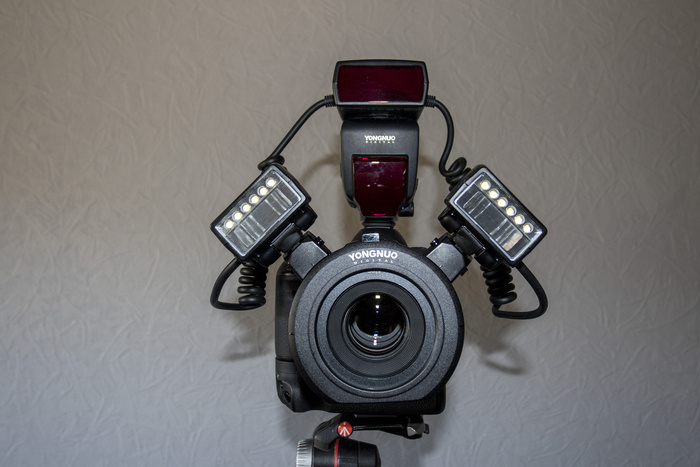
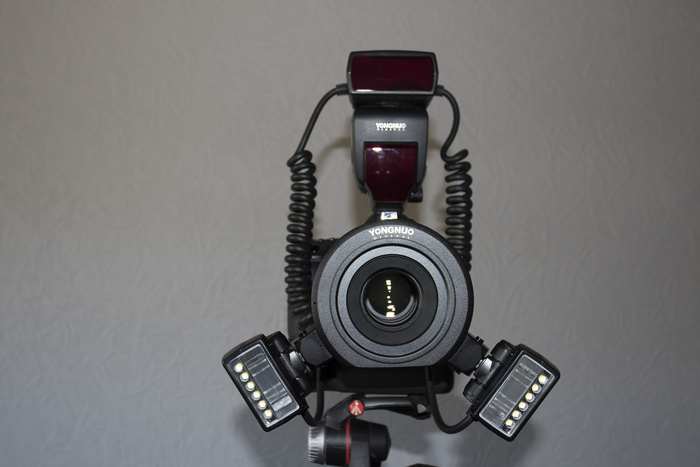
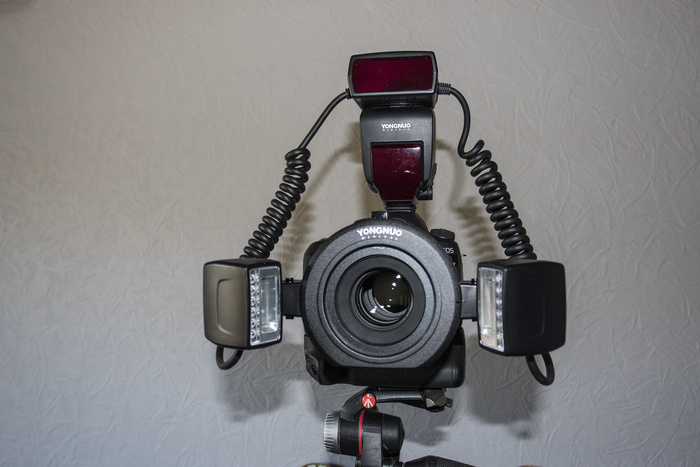

There are a group of LED lights on each unit which can illuminate your subject further in poor light, these can be used independently and in two levels of brightness - they are very handy indeed.
The main flash unit can use ETTL metering which is totally compatible with Canon cameras.
N.B. This unit was for Canon cameras - please check if you are a Nikon camera user etc.
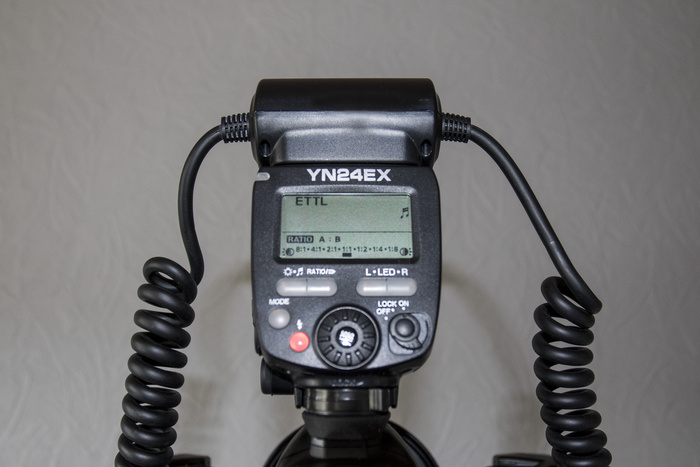
Or alternatively in full manual control as in conventional flash guns.

There is also exposure compensation and front and rear curtain flash for special effects.
The unit comes in a nice quality case with an English manual.
I can recommend this unit, it feels good quality and also performs very well.
This combination will produce great images for people who like macro work and I can highly recommend both.
Item 13
13. Canon RF100-500 f7.1 lens
Recently I sold my little Sigma 150-600 contemporary lens and whilst I have no real complaints about this lens, time moves on. By that I mean I have bought a Canon R5 mirrorless camera which is a major step up from my trusty Canon 7D2 DSLR and to marry up a lens like the Sigma with a new Canon mirrorless body wouldn’t be taking full advantage of the new technology. The Sigma produced some very nice images, especially on my holidays where I wouldn’t take my Canon ef600 f4 mk2 lens because it’s just too big and awkward to travel with and far too expensive to risk in the cargo hold of an aeroplane. The principal problem with the Sigma and the Canon 7D2 is that this combo really struggled to auto focus in diminishing light with the lens at f6.3 and 600mm, it really used to hunt back and fore, and with the 1.4 tele converter attached it was unusable in all but the very brightest sunshine – quite frustrating!
Pleasingly the new Canon R5 on my 600 f4 Mk 2 with the EF/RF adaptor is seamless, even with the Canon 1.4 tele converter and the crop factor selected in the camera giving me 1344mm at f5.6, (600 x 1.6 x 1.4), this is a lot of reach at a very workable aperture and that’s why it’s still much better than the Sigma by a long chalk.
However, it’s about 8.5lbs in old money and that’s still heavy, not as heavy as my old 600mm Mk1 admittedly, because that was like carrying a blacksmith’s anvil! Undeniably though when I’m photographing wildlife from a ‘Stake Out’ in a portable hide e.g. Kingfishers, Cuckoos etc. the image quality is unbeatable. Unfortunately that’s not always possible and there are always scenarios where portability has a distinct advantage. I can’t shoot with the 600 handheld, I’m just not physically capable, and I don’t think many people would be, perhaps a Russian weightlifter might be able to. I have to mount the 600 on a heavy duty gimbal head and that has to be in turn mounted on a sturdy tripod. This accumalated weight is about 20lbs, this may not feel like much at first but after a mile or so believe me it really gets to you. Therefore, without exception everybody gets fed up with carrying this weight and consequently seeks lighter alternatives. This is where I am at the moment, fortunately I am in the financial position where I can afford to keep the 600f4 lens and only use it for certain situations as mentioned above.
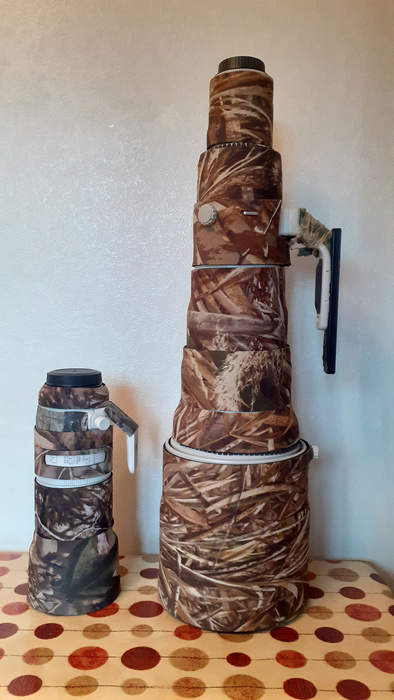
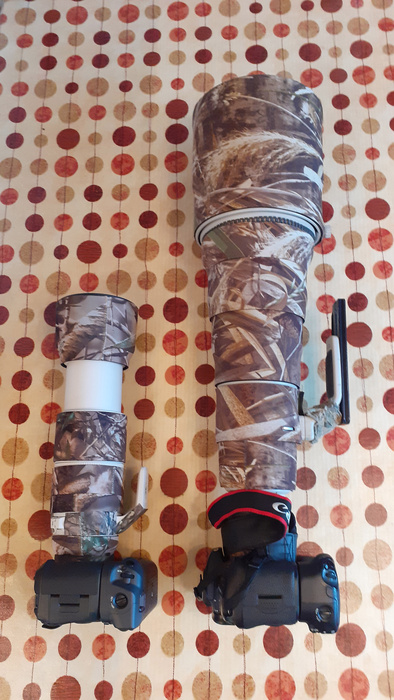
A size comparison between EF600 f4 + RF100-500 f7.1
The big question was what I was going to replace the Sigma with as a walk around lens? After much deliberation I have bought the Canon RF 100-500 f7.1 zoom lens. That may seem unwise because the 100-500 is f7.1 at 500mm and Sigma was f6.3 at 600mm. However, the Canon is only f7.1 between 472 and 500mm - the last 28mm, but it is still 100mm shorter than the Sigma. In contrast to the Sigma, however, with the Canon R5 even at f7.1 in the same light the Canon 100-500 auto focus is lightning fast, especially with the animal eye tracking enabled.
A questionable design, however, for some people is with the Canon 100-500 if you attach a tele converter you cannot zoom out below 300mm because there is a physical stop within the lens to prevent the two lens elements, (converter + rear lens), touching each other and causing damage. This is undoubtedly restrictive in some cases but it’s not a problem for me because I only use a tele converter at the ‘Long End’ of a lens. It is, however, something to consider before buying this lens. With a 1.4 tele converter attached the Canon 100-500 is reduced to f10 – very narrow it would seem! The Sigma was reduced to f9 with a 1.4 tele converter. Disappointingly though the combination of the Canon 7D2 and the Sigma was virtually unusable because they performed ridiculously slowly. Conversely the Canon R5 and 100-500 even at f10 in similar lighting conditions focusses so quickly, and without any apparent image degradation.
Another bonus is the in-body image stabilisation (IBIS) in the R5, when this is coupled with the 100-500 image stabilization system it allows you to shoot at really slow shutter speeds or alternatively if you prefer to use faster shutter speeds then the R5 can easily accommodate the correspondingly elevated ISO settings. You can’t alter the laws of physics but these modern cameras certainly go a long way to mitigating these effects. I can now say with confidence that with the 1.4 tele converter attached to the R5, resulting in an f10 aperture on the 100-500 and using the 1.6 crop factor in camera giving a total focal length of 1120mm, (500 x 1.4 x 1.6), there is not a problem in any of my photographic scenarios - and this is handheld!
If there is one small caveat I have about this lens it’s the lack of a mounting lug for a carrying strap. I have seen people carrying them on YouTube by just holding the camera body, that’s not for me, not only is this carrying method putting stress on the camera mount but sooner or later you will probably drop both camera and lens to the ground. To solve this problem I bought a Black Rapid Curve Breathe padded strap that fixes a screw into the lens foot with another safety tether to the camera straps lug. This is a very good strap and carries this lens slung across my shoulders very comfortably indeed, in fact it feels almost weightless. It also allows you to very quickly bring the camera and lens up to the shooting position.
That small issue aside, handholding this combination would have been impossible previously, in addition, such is the efficiency of the in camera and lens dual stabilisation, hand held videos are possible – remarkable!! This removes the need for a tripod, especially on holidays saving more weight and room. Using a combination of the R5 and RF100-500 f7-1 lens is revolutionary for me and I can unequivocally recommend them.
Here is a comparison between the three lenses:
Sigma 150-600
F6.3 at 600mm
Weight 1930g
Filter size 95mm
Length 260mm
MFD 2.8M
Canon RF100-500
f7.1 at 500mm
Weight 1370g
Filter size 77mm
Length 207mm
MFD 1.2M
Canon 600 f4 Mk2
f4 at 600mm
Weight 3920g
Filter size N/A
Length 448mm
MFD 4.5M
With regard to images I live in the real world not a world of comparison charts, a world where wildlife doesn’t stay still and pose for you and your images are the real evidence of how a lens is performing. Yesterday Susan and I were walking along the banks of a local river when we spotted a female Goosander, now these are very spooky ducks which will immediately swim away or fly off as soon as they see you. This duck was about thirty yards away and true to form it started to swim away as soon as it saw us. However, I managed to get a shot - the R5’s animal eye tracking locked on immediately. I wouldn’t have got this shot with the Sigma because of the auto focus delays I know I would have had. It was all over if a few seconds. The lens aperture of f7.1 posed no problems whatsoever.
Here are some images taken wth this lens.
Female Gooseander, handheld.
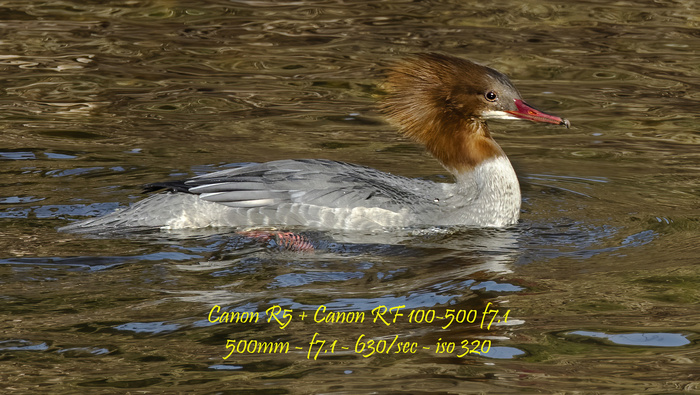
A pair of Goldfinches squabbling in my garden in very variable light.
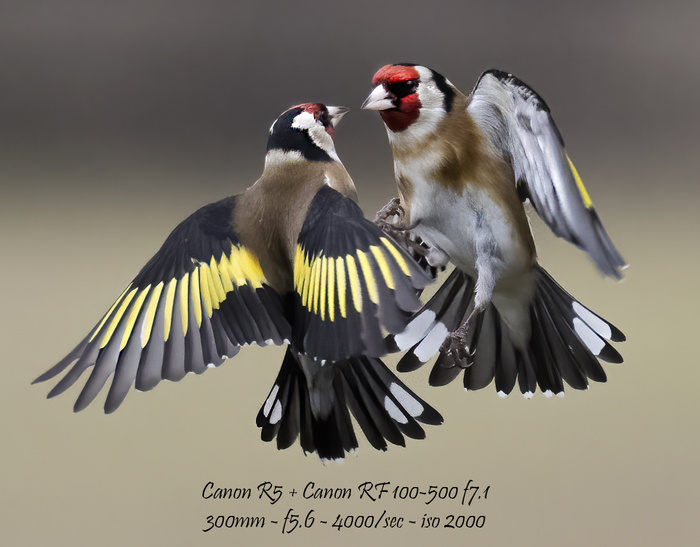
Lovely clarity with this lens.
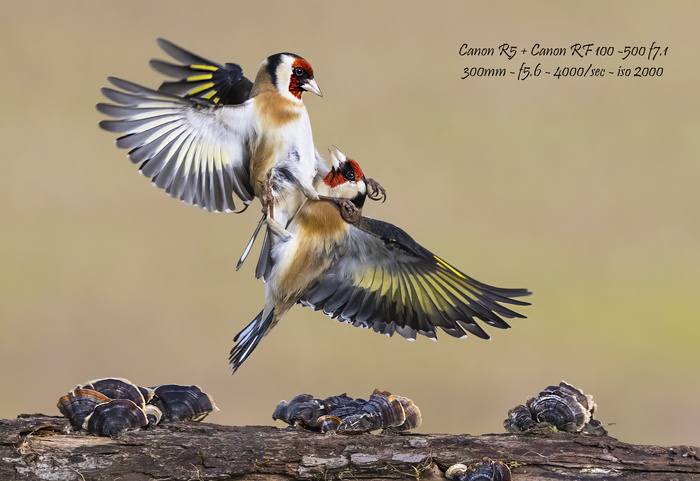
Red Footed Falcon in flight - Handheld - Lesvos 2023

In summation;
If anyone is considering buying this lens but is worried by the perceived 'Narrow' aperture of f7.1 then I can honestly say this should not be a consideration. (Admittedly the DOF produced by a lens with a 'Narrower' aperture will be deeper and therefore less buttery smooth then the DOF produced by a big prime lens eg 600 F4. However, as can be seen in the above images, with regard to backgrounds, employing a little thought while setting up shots can partially mitigate the effects of DOF.
With regard to light when coupled with a camera like the Canon R5 (or I'm sure the Canon R6), there is nothing to worry about because you can shoot at very high ISO's and still obtain relatively clean images. In addition a recommended buy for a very reasonable price of just over £100 is the (Topaz AI denoise software), which will very effectively clean up most noisy images in post processing.
Contents:
1. Canon EF 500mm V EF 600mm f4.0 Telephoto lens. Click here to read Item 1.
2. Manfrotto V Jobu Gimball Heads. Click here to read Item 2.
3. Canon EF 17-40mm f4.0 L USM Wide-angle Lens. Click here to read Item 3.
4. Manfrotto MT057CS3 Tripod. Click here to read Item 4.
5. Canon EF 600mm f4.0 IS Mark 1 / Mark 2 Comparison. Click here to read Item 5.
6. Manfrotto MHXPRO-3W Tilt and Pan Tripod Head. Click here to read Item 6.
7. Hahnel Combi TF remote control. Click here to read Item 7.
8. Vortex Razor HD 10 x 42 Binoculars. Click here to read Item 8.
9. Sigma 150-600mm (Contemporary) f5-6.3 OS Zoom Lens. Click here to read Item 9.
10. XIKEZAN 12mp / 1080p Trail Camera. Click here to read Item 10.
11. Vanguard Alta Sky 66 Long Lens Backpack. Click here to read Item 11.
12. Canon EF 100mm f2.8 L IS USM Macro Lens and Yongnuo YN24EX Twin Macro Flash. Click here to read Item 12.
13. Canon RF100-500 f7.1 lens. Click here to read Item 13.
_____________________________________________
Item 1
1. Canon 500 V 600
This is an ongoing question asked by people who are thinking about taking up Wildlife Photography;
I have used both the Canon 500 and 600 F4.0 extensively, so I feel I am fairly well qualified to air an opinion on their pros and cons.
The first thing to consider is the cost, which I admit is quite considerable, you could buy a small family car instead. In addition, once you have decided to buy one of these lens, self doubt will creep into your mind, you will begin to think whether you can or cannot justify the expense. The only evidence that your spending was justified will be the quality of the images you produce, there are no excuses.
The first time you use one of these big prime lens you will be somewhat taken aback by their unwieldy nature and also their weight, you will be terrified of damaging them, dropping lens like these onto concrete or tarmac is the stuff of nightmares and so the very first thing you should do is contact your insurance company to arrange extra cover.
You will not be covered under your normal insurance policy!
I see people running along carrying these lens over their shoulder while still attached to their tripods, they think because their lens is attached to an expensive head this provides some sort of impunity from damage. I would not recommend doing this because it doesn't matter what type of head is supporting your lens, the only thing that is preventing the lens hitting the ground is the integrity of the 1/4 or 3/8 inch tripod head bolt. If this bolt shears then the head and lens will hit the ground.
If that hasn't frightened you off we can get down to the pros and cons of these individual lens.
These lens along with Nikon are the most used big prime lens bar none, they have dual mode image stabilization designed to limit lens movement and it really does work very well, it can allow the user to shoot at very low shutter speeds, which wouldn't be possible otherwise.
They both have lightning fast auto focus which locks onto the their target instantly, this auto focusing itself has three positions which allows the lens to focus in three distance bands. If you want to focus quite closely or medium distance or if you are focusing on a distant object, this feature allows the lens to operate in a particular range so it focuses quicker without 'hunting'.
In all these features both these lens are identical, they both produce razor sharp images, are both built to professional standards, ie weather sealed and built like a tank.
The burning question is, which is the better wildlife lens.
Lets take focal length;
This is always the biggest question facing prospective users of these lenses, is the 500 long enough or do I need the 600?
Although the 600 is only 100mm longer in focal length than the 500 this does not mean that images seen through it are 20% larger, this is a common misconception!
Look how the 600 dwarfes the 500!!
Images seen are two dimensional so it is the focal length squared that applies eg.
500 x 500 = 250000
600 x 600 = 360000
This means that the 600 sees an image which is 44% larger than the 500.
This is a considerable amount.
Further;
A 500 mounted on a Canon 7D will give you 500 x 1.6 = 800mm focal length.
A 600 mounted on a Canon 7D will give you 600 x 1.6 = 960mm focal length.
Add to this a 1.4 converter and the gap grows even more;
500 x 1.6 x 1.4 = 1120mm.
600 x 1.6 x 1.4 = 1344mm.
Both lenses retaining auto focus and image stabilization.
On my Canon 1 series body with a x 2.0 converter;
500 x 1.3 x 2.0 = 1300mm.
600 x 1.3 x 2.0 = 1560mm.
Both lenses retaining auto focus and image stabilization.
This is why I kept my old Canon 1D Mk 2.
These bodies retain auto focus up to f 8.0.
So my maximum reach is 1560mm with auto focus and image stabilization!
No contest you might think, until you factor in a few other considerations;
The 600 is £2,000 pounds more expensive than the 500.
The 500 weighs around 8.5 lbs
The 600 weighs around 11.6 lbs
Not much perhaps, until you carry it, I can say from experience that it is a great deal of difference, it is much heavier.
The 600 is 0.8 inches bigger in diameter, so what? until you find it's more than you think and you can't fit it through the opening in your local bird hide.
The 500 minimum focusing distance is 14.8 feet.
The 600 minimum focusing distance is 18 feet.
The 500 has a clear advantage here.
The 600 is nearly 3 inches longer, not much? but you can't fit it in most lens bags.
You could just about get the 500 into your hand baggage on a plane, the 600, absolutely no chance whatsoever!
The 500 can just about be mounted on a high quality Ball Head on your tripod, with the 600 you absolutely must have a 'Gimbal' type head, a further expense, as much as 500 pounds!
This is starting to even out!
The bottom line is, if you want to photograph smallish animals like Hares, Otters and Stoats discreetly from a distance or medium to large size birds and if you want to be mobile or travel abroad, then I wouldn't hesitate buying the 500, you will not be disappointed. This lens coupled with a 1.4 converter and using a portable hide is a killer combination and I highly recommend it.
If you want to photograph very small birds or very shy wildlife and you are reasonably fit, and be assured you will need to be. There is no better lens than the 600 for the job, all forms of wildlife are shy and the further away you can take images from the better. This is where this lens comes into its own, you can stay further away from your subject while having the same magnification as the 500. I also highly recommend this lens.
Assuming finance is not a problem, the choice is far from easy, you have to balance portability with reach. I find that with the 500 I tend to leave the 1.4 converter on all the time, with the 600 you can shoot with the bare lens more often.
This gives you 1 stop more of light which is a big advantage in most situations.
I would recommend trying before you buy, every wildlife photographer wishes they had more focal length, I do on a regular basis. However, if your favourite lens is too heavy to carry.......................
For comparison the Canon 600, 500 and 300 f4.0 lens.
___________________________________________________________________________________________
Item 2
2. Manfrotto 393 V Jobu Pro 2B Gimball Head
It's that quiet time of the year again, not many birds around, so I thought I would examine the merits of two tripod heads.
Based on my experience.
I stated previously in a Canon 500 V 600 review that a Gimball type head is an absolute necessity if you are using the largest of the telephoto lenses and I absolutely stand by that statement!
A Gimball head design is where a lens sits on a cradle and once it's balanced it becomes almost weightless as all the weight is transferred down through the tripod and movement of the lens is very easy indeed. This is a far superior method of supporting a large lens than for example using a ball head where the lens can tilt over if the friction on the ball cannot overcome the lens weight.
Most people, myself included feel quite faint when they see the huge cost of some Gimball heads. The question is are they worth all that extra money or can we get away with using a much cheaper head?
Until about five years ago the Wimberley Gimball head was the only head of this type available and it retailed for around £500. However, there are now about a dozen manufacturers of these type of heads, some very good, others quite frankly are rubbish, they may seem good value but the old saying 'you only get what you pay for' is very true.
A number of years ago I decided I would not pay the Wimberley price, I felt a price of £500 was really over the top and questioned how they could justify charging that much.
I realised, however, very early on after buying my first big prime lens that I would have to upgrade my tripod and head, that much was obvious after I tried to mount a Canon 500 f4 on my old set up. I fortunately bumped into a man who was having the same trouble as me and he showed me his new head which looked very sturdy and cost only £99. I immediately bought one and was very pleased with its performance.
That head was the Manfrotto 393 Long Lens Bracket and it has become very popular with photographers all over the country.
I used this head for over a year and was very happy with it, getting good results for most applications, however, problems started to appear. This head relies on friction to keep its cradle in a particular position, the 'U' shaped cradle sits inside another bigger 'U' shaped bracket and two bolts pass through the cradle and bracket and friction is applied by tightening these two bolts via two knobs on the sides of the bracket. There are two tiny ball races in between the bolt washers and these are the only means of smoothing out the movement of the cradle, but they are totally inadequate.
Unfortunately after you tighten the bolts and then move the lens back and fore the bolts tend to move with the backward and forward motion and become loose again. All this tightening and loosening wears the threads on the bolts and the thread on the bracket until in the end they will not tighten any more and the cradle will not support the lens in an angled position. The same applies to the thread that connects the head to the tripod,
this time panning of the head loosens the connection. In the end after one pan or a few back and fore movements of the cradle everything needed to be tightened up again. This became unworkable and I realised I had to look at other Gimball type heads.I knew I had to pay so I did a great deal of research on the heads available. Previously I mentioned Wimberley had been the benchmark for years, but nothing stands still and I looked at five different heads in great detail. Finally I decided on the Jobu Pro 2B, the latest Gimball head from this company.
I decided on this head after contacting Jobu and having prompt, very honest and constructive feedback. The features that persuaded me to buy this head over, in particular the Wimberley Mk2 were, this head uses full roller ball bearings on all articulations, Wimberley still use sleeve bearings, the main supporting arm is the stiffest and strongest of all the heads I looked at, this was achieved without dramatic weight increase, also this head has a locking device that prevents the lens from moving when being carried. A simple device but something other Gimball head makers need to feature as it is a frequent criticism of these heads, particularly the above mentioned Manfrotto. Lens movement in this way can very easily lead to damage.The Manfrotto and Jobu heads weigh about the same, 3.5lbs, both with a 3/8 inch mounting thread. I will never use a tripod with less than a 3/8 inch thread, a 1/4 inch is not strong enough for these heads and adding a 1/4 to 3/8 inch thread adaptor doesn't give any more strength.
Finally the day came and when I unpacked the Jobu head it just screamed quality, I could see without touching it how strong it was, when I mounted it to my tripod I hand tightened the locking ring and it has not moved a millimetre from that day onwards. After fitting the mounting plate to my 600 f4 lens, fitting it into the head clamp and balancing up, the merest caress of the friction knobs is enough to instantly position the lens at any angle.
I cannot believe how smooth the panning and tilting actions are, they are an absolute dream to use. I can loosen the panning knob right off and spin the lens around a hundred times and the locking ring just stays absolutely still, then one millimetre of friction and it's all locked up again. This head is an engineering masterpiece!!
The mounting plate and cradle adjustment knobs have stops, meaning you cannot lose them, the friction knobs are soft rubber coated for ease of use. The cradle can be adjusted vertically, an operation which is as smooth as silk, and the plate which unfortunately you have to buy separately, has pins to stop the lens from sliding out.
There is no comparison in these two heads, now I know what I have been missing, it's expensive but I cannot see me buying another head for the rest of my days it is such high quality.
The only redeeming feature of the Manfrotto head is the good quality mounting plate which comes free, with the Jobu and all other makes you have to buy the mounting plate separately.
The cost of the Jobu head was £593 with the plate, some people will inevitably say that you could buy five Manfrotto heads for the price of this one, they currently retail at £125, but you will never achieve the smoothness of operation and quality of this Jobu head.____________________________________________________________________________________________
Item 3
3. Canon EF 17-40mm f4.0 L USM Wide-angle lens.
I have been thinking of buying a wide-angle lens for some time, but it was not an easy choice. There are a large amount of wide-angle prime and zoom lenses on the market and making a final choice is far from straightforward. I started by deciding whether to get a prime or a zoom. I am not normally a zoom person but with wide-angle lenses for landscapes, that is what it would be used for, I felt a zoom would be easier for composition.
The next decision was which manufacturer? One was Canon because of my Canon cameras and the other was Sigma who produce a very good range of wide angle lenses. Having done much research I decided to stick with Canon purely for the build quality and the compatibility with Canon cameras.
Next was what focal range would suit best, I didn’t want an extremely wide lens because I don’t like the way the images look, for me they become distorted and out of perspective. I always like, if possible, to retain a natural look to an image.
Finally it came down to the Canon ef 16-35, L, f4.0, is, USM or the Canon ef 17-40, L, f4.0, USM.
The Canon 16-35 lens retails for about £1100 and the 17-40 retails for about £580.
What I needed to find out was if the 16-35, that was double the price, was twice as good as the 17-40.
The answer to this question is an emphatic NO!!
The 16-35 is undoubtedly sharper wide open but once the 17-40 is stopped down there is very little difference in sharpness.
Because of this I decided on the 17-40, which I managed to buy at £529.
This is a Canon 'L' series lens, it has the 'Red Line' designating this, the 'L' series are the highest quality lenses that Canon make.
It comes with a soft pouch, which is not much use really and a large ‘Petal’ type hood, which I’m not sure does anything but all these type of lenses seem to have them these days.
This lens weighs in at just over 1lb so carrying it around is really comfortable and you wouldn’t know it was in your bag.
It focuses so quietly that you think that nothing has happened, until you look through the viewfinder and see your image perfectly in focus.
The images it produces rival the much more expensive Canon 16-35 once the lens is stopped down.
It focuses down to 11 inches so getting close to the odd insect while on your travels is quite easy.
The 17-40's filter size is quite large at 77mm, so good quality filters are quite expensive, nevertheless two things you should budget for are an UV filter to stay on the lens permanently for protection and to filter sunlight and cut down haze. Furthermore a most important addition is a good quality circular polarising filter to minimize unwanted reflections and to give your images richness, contrast and clarity, without affecting the colour balance. One advantage with this lens is that the front element does not rotate making the use of circular polarising filters easy, as once set they do not move when zooming or focussing.
One word of warning when buying expensive filters for these lenses.
It is always advisable to buy the slim line variety of filters such as the Hoya Pro 1 digital range. They are of a slim line design because they do not cause vignetting when very wide-angle lenses are used on full frame or 1.3 cropped bodies. A Hoya Pro 1 polarising filter can be attached to the already attached Hoya Pro I UV filter without any vignetting affecting the image. While some of the ‘high walled’ cheaper filters may seem a good buy, they will be a false economy when you have dark shadows in the corners of your images!!
The Canon 17-40 is best used on a full frame or a 1.3 cropped camera body where it will produce very high quality landscape images. However, on a 1.6 cropped body like a 7D, although vignetting will become non-existent, the lens ceases to be a really wide-angle lens.
It would be unfair of me not to extol the virtues of the Canon 16-35mm f4.0 lens because it is a flagship Canon ‘L’ series lens with image stabilization and if you want to take photographs indoors or handheld or you operate in relatively low light conditions then this is the lens for you.
The only thing that stopped me buying this lens was I didn’t feel it justified the price compared with the 17-40.
I personally don’t need image stabilization for landscape photography.
For best results I use the Canon 17-40 lens on a lightweight carbon fibre tripod with a corded shutter release. I can easily carry this lightweight combination all day if required.
These factors lead me to conclude that if you want a high quality wide-angle lens that is reasonably priced and easily carried around, that produces sharp colourful images which are full of contrast, then this is the lens for you.
Image below taken with a Canon 1DMk2 DSLR / Canon 17-40 f4.0 lens / Hoya Circular Polarizing filter. Manfrotto lightweight carbon fibre tripod with a Manfrotto 3 way tilt and pan head (See Reviews), / Canon corded shutter release.
I highly recommend the Canon 17-40mm f4.0, ‘L’ series lens.
____________________________________________________________________________________________
Item 4
4. Manfrotto MT057CS3 Carbon Fibre Tripod.
In previous equipment reviews I made it quite clear that I thought the Jobu Pro2B gimball head was a fantastic bit of kit. Nothing has changed, it continues to perform flawlessly, however, after a few months I have developed a distinct feeling that this head is too big for the tripod I was using, the tripod being the Manfrotto 055 CX3.
With a Canon 600mm F4.0 lens and a 1 series body mounted on the Jobu head it appears that this combo is too much for the tripod. I always thought that this might be the case especially in windy conditions.
Lately this has become apparent, as I tend to put one arm over the lens to steady it in windy conditions. When doing this I could feel the 055 tripod legs bending, so I have decided to invest in a new and more robust tripod.
The Gitzo range of tripods immediately came to mind, expensive, but supposedly the best!
I never buy any equipment without meticulously examining every possibility. Therefore I ran the microscope over the latest Gitzos and what I found did not make pleasant reading.
Lately there has been repeated material failure on these tripods and nearly all in the same place. Where the tripod legs attach to the tripod platform, as in all tripods, a bolt passes through the drilled hole in the platform and leg. This area, even to a non-engineering person would be identified as a crucial stress area where strong components would be used. This, however, with Gitzo tripods does not appear to be the case. The platform on these tripods is made from a Magnesium/Aluminium alloy, quite common these days with many manufacturers, including Manfrotto, minimizing tripod weight. It would be logical to assume therefore that attention to the thickness of the alloy in this area would be paramount. The fact is that on Gitzo tripods, after examination, it appears the alloy in this area, where the leg bolt passes through the platform, is in places no more than 3mm thick.
Also if the coating on this alloy is chipped by accident, there have been instances where the alloy has started to ’Powder’ and crumble.
Here is an typical example of this material failure.
This is not just a matter of buying a new leg, the whole tripod is ruined!
Secondly I don’t like the new ‘Systematic’ platform design. In theory it is practical to be able to interchange heads between platforms but the way the various heads are mounted on the tripod platform is a recipe for an accident if ever I saw one. Your equipment is screwed into a round plate via a 3/8inch screw, no problem there; however, this plate then fits into a metal ring in the middle of the tripod platform. Both plate and ring are machined for a tight fit and the ring is then tightened around the plate by a screw. However, if this screw works loose the plate is free to pull out of the ring and this has happened with catastrophic results.
Thirdly there are some horror stories regarding Gitzo after sales service, in short they don’t want to know about problems. Getting through to them is apparently an achievement and then the real battle starts. Whatever you do don’t go near salt water with a Gitzo tripod because it invalidates the already very tenuous guarantee.
This is something you don’t expect from a tripod that can cost up to a thousand pounds!
I then found out that Gitzo have moved their manufacturing base; this is always done to save costs.
Also it is Manfrotto / Bogen who carry out repairs for them because they don’t appear to have the repair infrastructure to support their product.
It is sometimes amazing how a company can perpetuate a myth regarding quality and then appear to sit on their laurels.
This doesn’t wash with me because I only deal in facts.
I was thoroughly put off Gitzo Tripods after this research.
My problem was I didn’t know of any other tripods that were robust enough to support my equipment and didn’t involve re-mortgaging my house.
After more research I came across the Manfrotto 057 series of tripods, which were at the top of their range.
These tripods were retailing between six and seven hundred pounds depending on whether it was the three or four section. I still considered this to be large amount of money for a tripod. However, I really liked the look of them, they seemed very robust and there were really good reviews supporting this. I battled on with my 055 series Manfrotto for a couple of months until I was looking on Amazon and they were retailing the 057 three section tripods for three hundred and eighty pounds. I bought one immediately, I don’t need the four section because it is just too tall for my needs.
I have just taken delivery of the 057 tripod and what a piece of equipment it is!
It is without doubt the most robust and well-made tripod I have ever handled. I am over the moon with the quality in every aspect. The legs are made from 100% carbon fibre with Magnesium castings throughout the rest of the tripod.
The top tube diameter of the 057 tripod is 39.2mm as opposed to 29.2mm on my 055 tripod. The legs on the 057 have a really solid feel to them and they wont bend at all.
It is 132cms in height without the centre column raised; I don’t raise the centre column if I can possibly help it. However, when the centre column is fully raised the tripod is 157cms high.
When my 600 Canon lens and the Jobu head are mounted on the 057 tripod and the centre column is fully down, the camera viewfinder is exactly at eye level for me and I am six foot tall.
I established this prior to buying; it’s no good finding out after delivery. The tripod when fully closed measures 62cms.
The tripod platform is so much bigger and stronger than on the 055 tripod and it looks fully up to the job of supporting my kit. It has a 3/8inch tripod head screw.
The 057 has retractable spiked feet for different ground conditions.
There is also a built in spirit level at the bottom of the centre column, which you can conveniently look down on.
The centre column is 35mm in diameter and it is three faceted so it cannot rotate. It can also be removed for low level shooting and the minimum tripod height is then 22cms. The legs have three angle positions, adjustments can be made quickly and simply by pressing a locking tab.
This tripod is rated to support up to 18Kg of weight, more than enough for any combination.
It weighs 3Kg and therefore it is not a tripod for supporting your telescope, or for carrying long distances, it is too heavy, that would be better suited to the 055 series.
I now use my 055 for my landscape kit, still a very good tripod and ideally suited for mounting a ball head and camera.
To conclude; the Manfrotto 057CS3 / CS4 are exceptionally well made tripods, perfect for supporting a large lens and a heavy gimball head. The current retail price of £382.00 on Amazon is a real bargain; so if you are looking for a top-level long lens support, look no further than this tripod.
____________________________________________________________________________________________
Item 5
5. Canon ef 600 f4 IS Mk 1 / ef 600 f4 IS Mk 2 Comparison.
There are many views expressed on the internet by people who have never actually used these lenses.
The following comparison is based on my experience in the field, as opposed to theory and hypothesis.
I have used the Canon 600 Mk 1 lens for four and a half years and I feel, therefore, in a position to assess from experience the pros and cons of this so called super telephoto lens. Super by name and most definitely super by nature; unmistakeably this lens is a top of the range performer!
In terms of optical performance this lens is faultless; it delivers consistently sharp images under all circumstances. The image stabilization works superbly well enabling the lucky user to produce quality images even under the most challenging conditions. This lens is identical in build and design to the Canon 500 Mk 1, they differ only in weight and 100mm focal length. As I outlined in a previous review, this weight difference and the 100mm focal length are both considerable factors. The main reason for buying the 500 was its lighter weight and conversely the main reason for buying the 600 was its extra focal length. This was always the dilemma facing prospective buyers of these lenses.
The 600 Mk 1 weighed a mighty 11.8lbs and I can say from experience that it is a very heavy piece of kit to haul around. Carrying this lens for a mile or so will challenge even the most enthusiastic photoghrapher. With the 500 Mk 1 weighing a meagre 8.5lbs this alone was enough to persuade most people to buy the 500, only people like me, who wanted/needed the extra focal length bought the 600. The only advantage of using the 600 was its longer focal lengh, producing an image that was 44% larger than the 500. (Please see previous review).
However, with the arrival of the new Mk 2 Canon lenses the 600 Mk 2 now weighs in at 8.6lbs, basically the same as the 500 Mk 1. Thus confirming that if you could carry the 500 Mk 1 you can also carry the 600 Mk 2! The 500 Mk 2, however, weighs in at 7lbs a further weight loss of 1.6 lbs, but not as game-changing as the weight loss between the 600’s.
The Mk 2 lenses have really been ‘attacked’ by Canon and the design teams must have worked really hard on this new lens development. In particular the 600 and 400 lenses have achieved dramatic weight loss and to be fair they were in the first place the heaviest in the Canon arsenal. The physical dimensions of either the 600 lenses remains quite close, just a few millimetres either way, so quite insignificant. I didn’t think Canon could have altered the design of the 600 Mk 1 so dramatically. I thought they could reduce the weight slightly because there are always light-weight materials coming onto the market and in all walks of life these materials have made a big difference. How mistaken was I - When the 600 Mk 2 was delivered, I opened the packaging and I thought for a moment the Canon hard case inside was empty! It felt so light, I honestly thought some mistake had been made in the dispatch process. I was somewhat relieved to find that there was in fact a lens in the case and it was indeed the 600 Mk 2. Further was my surprise when I picked the lens up, (after being used to picking up the heavy 600 Mk 1), I found that there was hardly any effort required to pick up this new lens.
Quite frankly I am still in shock over the weight loss!
However, this dramatic weight loss is only the beginning of the new specifications of this totally revamped lens. The weight has now been much more evenly distributed across the lens. Gone is the front heavy problem, where if you tried to hand-hold the Mk 1 all the weight was on your front arm.
• The new lens is not front heavy any longer, this has been achieved by removing the protective front meniscus lens which was obviously very heavy. As a result when you place the Mk 2 lens on a gimbal head plate the plate has to go almost all the way forward to achieve equilibrium, previously with the Mk 1 the plate had to move all the way back. The Mk 1 was always trying to tip forward and care was needed to avoid this problem. To achieve this weight loss the Mk 2 lens is made from a combination of Magnesium and Titanium alloys, very lightweight but importantly, just as robust. The Mk 2 also comes with two lens feet, one for tripod and the other for monopod mounting. This shows that with the 27% weight loss it is now possible to shoot with this lens on a monopod, something that was unthinkable previously.
• The Mk 2 also has new Fluorine coated elements instead of a combination of Fluorine and UD (ultra-low dispersion elements) found on the Mk 1, lighter but better performing.
• Further attention has been paid to the ergonomics of the Mk 2 lens, the auto/manual focus switch is right at the rear of the Mk 2 making it so much easier to reach without hardly moving your fingers - much quicker. On the Mk 1 you had to reach forward to switch between auto and manual focussing.
• There is also a new power focus switch for the movie makers among us, this mode is designed to smooth out the changes in focussing when taking videos, not for me but I am sure very useful.
• Image stabilization is upgraded from two to three modes.
Mode 1, the standard setting, is used for stationary objects.
Mode 2 is used for horizontally moving objects, this mode stabilizes on one axis only.
This White Winged Black Tern was captured while handholding the 600mk 2 as the bird flew quickly past.
The new Mode 3 is dedicated for the enhanced tracking of moving objects in the vertical and horizontal positions. With image stabilization not being activated until the precise moment of shutter release, thereby eliminating the user fighting against the image stabilization mechanism when tracking an erratically moving subject.
Mode 3 proved particularly useful when tracking this Common Terns erratic flight pattern right up to its hovering position, I was able to quickly handhold the 600 mk 2 lens without much effort, something that would have been impossible for me to achieve previously with the 600 mk 1.
I waited for the bird to hover and then engaged Mode 3 IS to capture the action as the shutter was released.
• The minimum focussing distance is also now 39.3 inches closer, down from 216.5” to 177.2” another big step forward.
All these new features have catapulted these amazing lenses to the forefront of the super-telephoto bracket.
To summarise the basic differences in physical dimensions between the Canon Mk 1 and Mk 2 600 lenses:
600 Mk 1: Weight = 11.83 lbs : Diameter X Length = 6.6” x 18.0”
600 Mk 2: Weight = 8.65 lbs : Diameter X Length = 6.6” x 17.6”
Notice the lighter paint on the Mk 2.
One annoying problem that has been designed out is the unavoidable wearing of the paint on the barrel of the lens, when the lens hood was mounted onto the Mark i.
On the Mark ii this has been achieved by fitting a hard scratch resistant rubber/plastic type collar onto the lens where the hood is mounted.
To conclude, it might not appear such a quantum leap when looking at these dimensions, but the difference between these two lenses is significant. I can now carry the new lens without effort, before it was becoming an ordeal to carry the 600 Mk 1. (Bearing in mind I am six feet tall, thirteen stone and have led an active life). The new lens can now be carried on an aeroplane as hand luggage, this is a major bonus!! In addition I have also bought the new Canon Mk 3, 1.4 tele-converter which has its own micro-processor which allows it to ‘communicate’ with the new generation of lenses, allowing sharper and quicker focussing. Initial tests have suggested that even with the new 1.4 Mk 3 tele-converter mounted on the 600 Mk 2, the image quality is still superior to the ‘bare’ Canon 800 f5.6. I have always maintained that the 600 f4 was a more useful lens than the 800 f5.6, these recent tests if accepted will, unless it is upgraded, possibly prove the end for the 800 f5.6.
Ostensibly the only dilemma now facing prospective purchasers of either the 500 or 600 Mk 2 is the cost, because the weight question is now virtually irrelevant.
I was and still am a big fan of the Canon 600 Mk 1 and if you are constrained by budget, are fit and relatively young, and you will need to be, it still remains a very good buy.
However, the 600 Mk 2 is on another level in terms of image quality, design and ergonomics. My conclusions, based on the aforementioned technological improvements and also my initial use in the field are that it will take a very special lens indeed to knock the Canon ef600 mk 2 off its lofty pedestal.
____________________________________________________________________________________________
Item 6
6. Manfrotto MHXPRO-3W Tilt and Pan Tripod Head.
Lately I have experiencing a few irritating problems with my Giottos Ball Head. This head is a perfectly good head for landscape work when a lightweight camera is used. However, I use my trusty Canon 1D MKii camera for this work and it is a heavy piece of kit. When you pick it up it is what it feels like, a pro DSLR and I’m afraid the Giottos Ball Head is beginning to suffer under its weight. When I carry this kit over my shoulder this ball head just keels over letting the camera hit the tripod. I can’t complain really it only cost around £30.00 and is still fully functional but not for the Canon 1D Mk ii and Canon ef 17-40 f4 combo.
Therefore, I began my usual exhaustive search for a replacement and I have been slightly put off Ball Heads because of this problem so I started to look at Tilt and Pan Heads. There is an ongoing discussion about which is the better option between these two types of heads and both sides have valid reasons for their preference and rightly so. However, one thing I will say is that it appears it is necessary to spend more money on a Ball Head than on a Tilt and Pan Head to support the same weight of camera / lens.
This conclusion led me down the Tilt and Pan route;
As I have previously stated I am a big fan of Manfrotto products and I was naturally attracted to their range of heads, but I have to say that I put a limit of £100.00 on what I would pay for a head, so if Manfrotto didn’t have a head in this price range I would have looked elsewhere. I did indeed look at many manufacturers of these heads and there are a myriad of products out there, some cheap and nasty, claiming to be able to support ridiculous weights. With experience you learn to ignore these claims because they just don’t mean anything and you will have wasted your money. Many items are reproduced in India for example and they look the same but unfortunately they definitely don’t perform the same.
I began to dwell on one or two heads and principally the Manfrotto MHXPRO-3W Tilt and Pan Head. This looked a really solid piece of kit and I know from personnel experience after using their 057 series tripod, (review No 4), they know how to make great products. After comparing internet prices I bought this head online from ‘Camera World’, (a high street shop) for £89.00 plus £5.00 next day delivery and I highly recommend them for their pricing and service, first rate!!
I have now taken delivery of the Manfrotto MHXPRO-3W Tilt and Pan Head.
This is a superbly designed and engineered product, weighing in at 1Kg, not light beware!!
This head is 13cms tall and claimed to be able to support 8Kg, this last claim is totally believable, although I won't be using that type of weight it feels fully able to support it!
It has three functions, a forward / backward tilt, a sideways tilt and a 360 degree pan. All these movements have an adjustable 'Friction' setting and refreshingly they all work really well. Once your kit is positioned where you want it you just twist the locking levers and everything is rock solid, with some heads they just won't support their claimed weights in an angled position. THIS HEAD WILL!!!
Here it is with the old 'War Horse' on board.
What I really like about this head is the thought that has gone into it, the friction dials have such a finite adjustment, they suit all types of movement. The locking levers have good quality grips and they really do 'Lock Up'.
This head also comes with its dedicated 'Plate', unlike some where you have to buy the plate separately.
These levers are also adjustable in that they push in to save space when not in use.
There are also three spirit levels covering every angle.
All in all this is a truly superb piece of kit, perfect for someone who is interested in Landscape Photography and it looks great as well. I can see this head being a real big seller and I Highly recommend it!!!
____________________________________________________________________________________________
Item 7
7. Hahnel Combi TF Remote Control.
This remote control device is for triggering your camera shutter and/or flash unit from distance. I have a few corded shutter releases which I use for situations where light is in short supply, such as early mornings or late evenings. My latest Kingfisher shots were all triggered using this method, it helps to get sharper images at low shutter speeds by avoiding camera movement. However, there are obvious constraints, principally the length of the cord, typically these range from about 60 up to around 90cms. While these are perfect for shooting from a pop-up hide or just using off a tripod for landscape or macro work, if you want something more, then wireless is the way to go.
If you are not a big fan of wireless devices, I can understand that, but let me assure you this unit really does work.
It is very simple to fit and to use;
There are three components, sender, receiver and cable.
Different cables fit different cameras so just make sure you order the right unit for your camera, eg Canon, Nikon etc. Having said that the two cables they supply fit almost any DSLR camera. Obviously the cable end that fits the receiver is the same so it's only the cable end that fits the camera that could be different and most of them are the same, but do check!
Simply attach the receiver to the ‘Hot-Shoe’ on your camera, tighten the small locking wheel up to maintain a good connection and then plug one end of the lead into the receiver and the other into your camera remote connection. Ensure that the receiver unit is set to position 1 to save battery life then set the sender unit to ‘B’ for camera shutter release. There is also a 4 second delay position on the sender for timed shots. When you press the sender button half way down a green light appears and the lens that is attached to your camera will just focus, fully depress the sender button and your camera shutter will operate at whatever camera setting has been dialled in, ( 10frames /sec ) etc. When your camera or card reaches the buffer the shutter will stop, just as normal.
I have tried this device and up to now it is triggering my camera shutter from 30 metres with no problems. It is claimed it will be effective up to 100 metres.
Probably at high ranges there would be a delay in the signal but at thirty metres, (my first test), there is no time lag and I think this will be a very useful device.
Imagine if you regularly saw a Barn Owl perching on a favoured post. Set your camera up, (even with a short focal length lens), on a tripod, fit this device and hide up to 100 metres away. I think it would be best to focus the lens first then set it to manual focus to avoid any hunting. Wait for the Owl to perch and then trigger the camera shutter, (Boom), Gotcha!!
These units normally retail for between £35 and £45, but I picked one up (new) on ebay for £20. Sender, Receiver, two leads, batteries and instructions. You can also trigger a flash unit which fits on top of the receiver via its own Hot-Shoe and extra receivers can also be bought to trigger more flashes that can be fitted onto other tripods via their own standard tripod fitting.
I can highly recommend this unit, it does what is says on the tin!
____________________________________________________________________________________________
Item 8
8. Vortex Razor 10 x 42 HD Binoculars.
I have been contemplating buying new binoculars for about a year now, it has taken this amount of time for two reasons; they are a considerable amount of money and also they will be the last binoculars I will buy. Binoculars should last a very long time if you buy quality and I always buy quality optics, there is no compromise for me. Therefore, while I was away in Norfolk a couple of weeks ago I visited a retailer on the north Norfolk coast to try some binoculars first hand. Norfolk is one place where you can get your hands on equipment before you buy. Never buy binoculars without trying them first and try them thoroughly! It’s one thing to buy a lens on-line, you know what you are buying, I bought a Canon Ef600 f4 is ii lens online but I knew what I was getting, it’s different. With binoculars one person may like a brand and another might not, it’s how they feel and appear in your hands.
I have used a pair of Leica Trinovid 7 x 42 BA binoculars for over twenty years and they have travelled the world with me and have been faultless. There has never been one instance where they have not performed flawlessly; this is testament to their German engineering. However, although my eyes are still very good, they are not quite as good as they used to be. This is what made my mind up to change. I bought 7 x 42’s back then because I used to carry a telescope everywhere with me and if I needed more magnification then I used that. Now carrying camera kit I cannot carry a telescope as well, although I have the telescope in the boot of my car if really needed. I had to admit I needed more magnification and that meant going from x7 to x10 it wasn’t worth just going to x8 it wasn’t enough.
I set a limit of a thousand pounds for a pair of binoculars, bearing in mind I was buying two pairs one for my wife who had the same problem with magnification. I initially made my mind up to stick with Leica, tried and tested over twenty odd years, however, before I went to Norfolk I read a number of binocular reviews and one name kept cropping up, Vortex! An American company and they were having excellent reviews, it was being said that the image quality and build were as good as any out there.
I phoned up a relatively new company trading in Burnham Deepdale in North Norfolk by the name of The One Stop Nature Shop. This shop is run by two friends who have gone into business, they are both really nice people and are nature enthusiasts and who both use Vortex binoculars. They even offered me the opportunity to take the binoculars out onto the marsh to try before making any decisions. I declined that offer but I wanted to try the new Leica Trinovid HD 10 x 42 and the Vortex Razor HD 10 x 42 binoculars extensively.
As soon as I looked through the Vortex Razor 10 x 42 HD I was hugely impressed, there was a real pop to the image with a lovely ‘walk in’ feel. The Leicas just didn’t have it, and I was shocked, I expected more! Although the Leicas were about £150.00 cheaper what mattered to me was the image just wasn’t there. I asked my wife what she thought and she had exactly the same views. We bought two pairs there and then and we are both hugely impressed by these binoculars.
I have no doubt the Leicas HD Trinovids were superbly built and would see my birding days out. However, in reviews it was being concluded that the image seen through the new Leica HD Trinovids was for most people just about as good as the Leica Ultravids which retail for about £1450.00. If that is the case then the Vortex Razors are even better value.
To conclude, here are some facts and figures outlining the differences between my Leica 7 x 42 and my new Vortex Razor HD 10 x 42 binoculars.
This is not a comparison - that would be unfair- after all there’s twenty years of technology between them. A fair comparison would be between the new Leica Trinovid HD and the Vortex Razor HD and I have made my feelings clear on that above. The new Leica Trinovid HD binoculars were also lightweight and had good minimum focussing and field of view but the image quality went to the Vortex Razors HD.
Vortex Razor HD 10 x 42.
Min. Focus Dist. 6ft
Weight 24.8oz
F.O.V. 362/1000yds
Leica Trinovid 7 x 42 BA.
Min. Focus Dist. 20ft
Weight 32oz
F.O.V. 420/1000yds.
The FOV of the Razors is very good for a x10 magnification binocular, a x7 binocular is always going to be wider.
Only the very best quality components are used to construct the Razors, hence Vortex's confidence in their gaurentee.
The Razors are rubber armoured and are made from magnesium, giving them a lightweight but very robust feel. They have a really classy design which looks great. They have multi-coated lenses which show a very clear bright image even in fading light - impressive, there is no colour fringing that I can see. They also have phase corrected coatings to combat ‘phase shift’ a problem common with lower quality roof prism binoculars due to light waves reflecting off the opposite end of the prisms causing slight loss in image sharpness.
The Razors have twist-up eyecups which click in three positions and are the best I have tried and the eye piece diopter once adjusted is lockable. They also have a rain-guard that fits on the neck strap and objective lens covers that are held on the binocular barrels with quality rubber rings.
The Razors come with a high quality neck strap and case, (Leica neck strap and cases are pathetic and everybody has always moaned about them).
Mentioned above the Vortex VIP guarantee is the best out there, it is a no quibble lifetime warranty, irrespective of ownership, no registration required. Basically unless you reverse over them with your car or get them stolen they will repair or replace them free of charge. If you drop them and damage them – no problem you are covered.
Read up on it, it is the best out there!
I will keep my Leicas I can’t part with them for the going rate of about £300, they will be my trustworthy back-up binocular. However, for weight reduction, Min. focussing distance and improvement in image quality I chose the Razors.
The Vortex Razor 10 x 42 HD binoculars retail for around £1000 and if you are not a 'brand hound' and you get the chance to look through these binoculars, take it-you might be surprised!
____________________________________________________________________________________________
Item 9
9. Sigma 150-600 f5-6.3 OS Zoom Lens.
I have been looking for a good quality ‘walk-around’ telephoto lens for some time and there have been plenty of lenses to consider in the Canon range;
Canon’s 400 f5.6, 400 f4 DO, 300 f2.8 etc.
The 400 f5.6, although very good for flight shots, lacks IS and is a bit short on focal length and adding a x1.4 tele converter only takes it to 560 @ f8.
The 400 f4 DO is far too expensive to just use for walking around, it retails at around £7,000 and is also too short on focal length. It will work well with a x1.4 tele converter again reaching 560 and at a useable f5.6, but the cost is far too much for a second lens.
The Canon 300 f2.8 is also very expensive at around £6,000 and is quite heavy, again it is short on focal length; the bare lens is exceptionally sharp but it needs a x2 tele converter to get to a reasonable focal length – 600 @ f5.6. These x2 converters are not a good option for increasing focal length. On almost all lenses they degrade image quality badly and slow the lens auto focus dramatically.
I have had a Canon 300 f4 is lens for ten years and it is a very sharp lens, a sort of poor man’s 300 f2.8. I have taken some great shots with it using a x 1.4 converter, getting to 420 @ f5.6, but the same old problem was there, lack of focal length!!
However, there now appears to be a solution to this historical conundrum and it takes the form of the Sigma 150-600 f5-6.3 OS zoom lenses.
Sigma know how to produce zoom lenses, take the legendary 300-800 f5.6 (Sigmonster). A great lens but at 13lbs in weight, far too heavy for almost everyone. This lens is a very good performer but not as sharp as the equivalent focal length Canon 800 5.6 prime. I always prefer prime lenses to zooms but a prime lens with a long focal length as a walk around lens tends to be very expensive and quite unwieldy.
Therefore, I arrive back to a walk-around zoom lens;
The Sigma 150-600 f5-6.3 OS zoom lenses, (Contemporary and Sports), have had very good write-ups and have indeed been producing very good images. The sports version has the better build quality using more metal, (hood and body) and also has weather sealing, however, the image quality between the two is virtually identical. The Sports version is about £500 more expensive and is much bigger and heavier, at 6.3lbs not really a carry around lens. Only just over two pounds lighter than my Canon Ef600 f4 is ii lens!!
When I was watching some Waxwings locally during this winter’s irruption a friend of mine was using the Contemporary version of this lens. It was a golden opportunity for me to get a hands-on appraisal. When I held the lens I was impressed with how light it was, (it has essentially a composite shell), but it felt very well-built. It also focussed quickly and zoomed easily. I knew the images it produced were of a good quality and also the results with the x 1.4 tele converter were also good, (although autofocus will be a lot slower using the TC1401), I decided to buy both straight away.
N.B. Using the (Sigma x 1.4 tele converter TC1401) with both the Contemporary and Sports versions of this lens;
Adding this tele converter to either of these lenses makes them an f9 lens and they will only autofocus, (using the shutter button), with Canon Series 1 Camera Bodies and top end 1.6 cropped bodies like the Canon 7D ii., which retain autofocus at f8. NB. Although the camera aperture shows f9 when the tele converter is used it is obviously fooling the camera's autofocus system into believing it's only f8 thereby retaining autofocus.
I cannot comment on Nikon bodies having had no experience with them.
(Please check before purchasing the TC1401).
I ordered the Contemporary version of this lens with the x1.4 tele converter from Wex Photographic for £849.00. They arrived two days later bang on time from this top flight retailer. They might be a bit more expensive from Wex but the service and back-up they provide is second to none! I have also taken delivery of a lens coat and a Schott glass UV filter, to protect the lens from accidental damage to the body and glass.
N.B. Buying a filter for the front element of this lens;
95mm filters can be expensive, (even UV or Daylight), they can retail at well over a hundred pounds! There are cheaper versions on the market but they tend to be made from resin rather than glass and they will not be useable, producing blurred images, especially at the ‘long end’ of the zoom. Many people have had this problem, not realising until it was too late. However, with this in mind I saw a 95mm UV filter made by Schott glass advertised on Amazon. It was £20 and I thought it was worth a try because Schott make the glass for Zeiss and that told me all I wanted to know. After trials with this filter using a tripod and cable release I can confirm that there is no discernable difference in image quality between the bare and filtered lens.
Specifications;
Contemporary.
Weight = 1.93Kg
Dimensions = 105x260mm
MFD = 2.88M
Filter = 95mm
Sports.
Weight. = 2.86Kg
Dimensions = 121x290mm
MFD = 2.60M
Filter = 105mm
To summarise the Contemporary lens;
Splash and dust protection only.
OS (Optical Stabilization) equivalent to 4 stops of light.
OS mode 1 for general use.
OS mode 2 for horizontal panning.
Focus limiter switch.
2.8 – 10 Metres.
10 Metres to infinity.
Full.
Three position focus switch;
i. Auto Focus.
ii. Manual Focus.
iii. Manual focus override.
Zoom lock switch, (to combat lens creep when carrying).
Custom Switch for programming different focussing and stabilization parameters in conjunction with the Sigma Dock. The dock is also used for updating firmware etc.
Plastic lens hood.
Good quality soft case.
Case and Lens straps.
Removable lens foot, (1/4” thread, with replacement plastic ring to cover the lens body after the foot removal).
There is very little Chromatic Aberration visible through this lens.
When closed down 1 or 2 stops this lens is quite sharp throughout its range.
As mentioned previously, when this lens is coupled with the dedicated (Sigma TC1401) tele converter, autofocus is achieved using a Canon 7Dii. However, the autofocus is drastically slowed down on cloudy days and this tele converter is only really usable on bright days, (something to consider)!!
This combination gives an effective focal length of 1344mm @f8.
600 x 1.4 x 1.6 = 1344mm.
I can highly recommend this lens to anybody wishing to take up wildlife photography on a budget.
It is ideally used on a monopod or hand held.
It is recommended that you turn off the OS when this lens is tripod mounted.
However, this lens can’t be used like a professionally built lens, (exposed to bad weather and thrown around). The manual focussing ring is far too small and is difficult to use and the lens hood is cheap and nasty. However, these are quite small gripes, so basically, if you aren't bothered by these things and you look after your lenses as I do then there won’t be a problem. This lens will never achieve the image quality of my Canon ef600 f4 is ii lens but I can't carry the Canon all day in a small back pack!!
Grey Heron ; Canon 7D ii + Sigma 150-600 Contemporary f5-6.3, (handheld - 531mm @ f7.1 - 1250/sec)
Schott 95mm UV filter attached. (See above re filter).
Tawny Owl ; Canon 7D ii + Sigma 150-600 Contemporary f5-6.3, (handheld - 435mm @f6.3 -250/sec)
Schott 95mm UV filter attached. (See above re filter).
__________________________________________________________________________________________
Item 10
10. XIKEZAN 12mp / 1080 p Trail Camera.
I have been interested in finding out what wildlife is frequenting my garden during the night and also during the days when I am not around.
In order to find out I bought a Trail Camera, nothing too expensive, just something basic to get a few images that you can’t get under normal circumstances.
I’ve purchased a XIKEZAN Trail Camera from Amazon for £59.99 and also a 16 GB SDHC card to store the images for £8.00. There are some of these cameras that retail for up to £250.00 and I’m sure they are brilliant but I didn’t need that level of sophistication.
This little unit has an adjustable 8 / 12mp camera for still shots producing colour jpeg images. This feature can be set from 1 – 5 frames when the camera is activated by something. So if the camera is triggered it reacts in about 1 sec and takes 1 – 5 frames whichever is selected.
The unit is triggered by a PIR unit, similar to security lights and has a range of up to fifteen metres.
This unit also takes videos from 1080p / 720p depending on whether you select high or low resolution, the same applies to the jpeg images. The videos last for twenty seconds and then the unit goes to sleep and is then re-activated after either 1, 5, 10 or 20 minutes, which can be set by you, the video format is the standard AV1. Video footage in darkness is obviously black and white and is triggered by an infra-red sensor.
The unit is powered by AA batteries, use four for normal everyday use but it takes twelve for long usage, up to a year.
All images are time and date stamped.
It is very easy to set-up;
i Choose your location.
ii Set the unit to test and pass your hand over the sensor to see if it flashes.
iii Switch to the off position and then to PIR for videos and close up the unit and just wait and see what comes along, it couldn’t be simpler.
There is a dim glow from the infra-red sensor in darkness but nothing during daylight sensing.
It is waterproof and a webbing strap is provided for fixing around tree trunks.
Although it is waterproof I have built a small wooded enclosure, like a small nest box, to offer some protection in bad weather.
I have been very pleased with the results and these trail cameras can provide lots of interesting information on the behaviour of secretive wildlife.
I can recommend this basic trail camera it does all that the manufacturers claim.
Please see links below.
https://youtu.be/SOI0OUVctDE
https://www.youtube.com/watch?v=5-U9IEQZUcI
https://www.youtube.com/watch?v=OmA_kGydhOk
Item 11
11. Vanguard Alta Sky 66 Long Lens Backpack.
Lately I have been having trouble with my Lowepro AW600 Lens Trekker backpack. The main zip has come away from the bag's material, which in effect renders the bag useless. I took it to a branch of Timsons in Brecon and they put a new zip in but it is far too stiff to use, (for me at least), I like to open and close a bag smoothly. In fairness to them they refunded me fully and I can only praise them for their efforts.
Over the years I have found the aforementioned Lowepro bag perfectly adequate and it has served me well, my only gripe was that the lens I was carrying moved around in the bag when I was walking.
In order to fit a Canon ef600 f4 Mk ii lens + 1.4 Canon converter + 7D Mk ii DSLR + a padded lens hood, (fitted), all sitting on top of a neoprene camo lens cover I had to remove the bottom padded shelf from the bag. This still left some padding from the bag plus the padding from the hood and rain cover. This was a small price to pay for having the lens and DSLR ready to use straight out of the bag. (This combo involves having the Canon 600 lens hood reversed).
If you didn’t carry a waterproof cover and if you didn’t have a 1.4 converter attached to the lens, then all the bag’s padding could be left in situ. If you were using e.g. a Canon ef500 f4 you could fit all the above combo and the padding with ease.
However, I’m not one to stand still and if new products catch my eye then I will investigate them. Having said that I don’t change just for the sake of changing. It was obvious that I had to get another bag and soon – up until recently the Lowepro was the only alternative, nothing else was big enough to carry a 600 f4 lens. However, there are now other manufacturers of these bags on the market, and understandably so because there are a lot of long lenses around these days and a lot of business to do.
One manufacturer that caught my eye was ‘Vanguard’, they have been around for quite a while and make a large range of good quality bags. After my usual exhaustive research, involving measuring external and more importantly internal dimensions very accurately – it’s no good buying a bag and finding that your gear won’t fit in the way you want it to – never go on other peoples findings based on their gear!!
I ordered the Vanguard Alta Sky 66 backpack from Mifsuds in Devon.
The bag was on offer for £178 so I took advantage of this price. However, many retailers had a promotion that was live until the end of December 2018 and this involved buying the bag for about £215 and applying for a £50 cash - back from Vanguard, bringing the price down, if successful, to £165. I couldn’t be bothered applying for this deal for the sake of £13 and it would take about ten weeks to fulfil – not worth it!!
In see that these Vanguard bags are currently retailing for just over £200 the Lowepro bags are around £230.
I received the bag before Xmas 2018 and I am very impressed with the standard of manufacture. It is slightly smaller than the Lowepro but this means that the lens is held more tightly when I am walking - I like this! But as a consequence of this the 600 lens takes slightly more time to remove from the bag but with practice it is easy. With a 500 f4 for example it would be less tight and therefore quicker to remove the lens. There is one modification I have had to make and I knew I would have to do this because during my research I read that the sponge collar that holds the lens in place was not suitable, the recess in the collar was too small. This means that a 600 f4 lens barrel, (where the camera is mounted to the lens), would not fit into the ‘U’ shaped collar. To overcome this minor problem I opened up the nylon cover that the sponge collar is in and cut a bigger recess in the sponge with a Stanley knife. Then just put the sponge back in to the nylon cover and refitted it back into the bag, it is held onto the bag by Velcro as in all these bags – easy! It now holds the 600f 4 lens perfectly.
This Vanguard bag has more pockets than the Lowepro but they do not hold bulky items and the Lowepro front pocket is bigger.
I suppose this has been done in the name of streamlining and I prefer this. The Vanguard bag is supposed to hold a ‘Tablet’ in the main pocket, Apple or such like but that was not an influence on me when I researched the bag. As well as the obvious Lens and Camera I only carry spare cards, a small bag to put a 1.4 converter in when not in use and a remote shutter release. With this Vanguard bag there are two side pockets that the Lowepro doesn’t have, one zipped and the other just elasticated.
The elasticated pocket is handy for carrying a flask/sandwiches.
The zipped pocket is more secure for car keys, mobile phone etc. etc.
There is also another small pocket on the top of the bag.
The Vanguard also has a fold-away reinforced tripod foot holder.
When a tripod is fixed to the front of the bag via two adjustable straps, the tripod’s feet are placed into this holder stopping it from slipping down. With the Lowepro there is a heavy duty collar fixed to the side of the bag that does the same job, however, I prefer my tripod to be centre mounted like on the Vanguard, because when side mounted as on the Lowepro the tripod swings around badly.
As in all these bags there is a fold-away rain cover.
In summation the Vanguard Alta Sky 66 backpack is very well made with quality materials, smooth zips, and well-designed pockets. The Vanguard bag’s padding around the ‘carrying areas’ i.e. where the bag is in contact with the person is superb and in this aspect it is definitely superior to the Lowepro.
The main back straps are also adjustable to suit different statures. Vanguard claim that you will be more comfortable carrying this bag than other similar back-packs and I have to say that, (based on my experience), it is indeed far more comfortable than my Lowepro.
The interior of the bag is a bright yellow/orange – not sure about this, but it is supposed to make it easier to find small items in low light.
The toggles are also bright yellow, and I get this more than the interior, because they are more visible and therefore easier to locate in low light.
In conclusion, if you want to carry a Canon ef600 f4 Mk ii lens and DSLR in comfort then I can highly recommend the Vanguard Alta Sky 66 back-pack.
Item 12
12. Canon EF 100 f2.8 L IS USM Macro Lens and Yongnuo YN24EX Twin Macro Flash
I’ve been thinking about buying a macro lens for some time. After some deliberation I decided to buy Canon - as usual, I like lenses that are compatible with my cameras because it just makes things easier. I bought a Canon EF100 f2.8 L IS USM Macro lens – a tried and tested performer.
With an aperture of f2.8 there is a shallow depth of field with this lens and this coupled with nine rounded aperture blades produces a very nice creamy ‘Bokeh’. I also wanted a lens I could hand hold, therefore image stabilization was necessary. I did think about the Canon EF180 f3.5 lens but it is much more expensive, heavier, has no IS and apparently is very slow to focus.
I have no intention of becoming a serious macro photographer I just want to add another string to my bow. It’s also a type of photography that can be done at home if necessary. It must be made clear that this lens is not made of metal as other ‘L’ series lenses are, it is made of ‘Engineering Plastic’ apparently quite strong and to be fair it feels very well built. However, the lens mount and the focussing ring are made of aluminium. This makes the lens very light for hand holding which is what I wanted – I am not going to be carrying a tripod around to try and photograph insects!
The lens has a hood for use on sunny days limiting lens flare.
True macro lenses magnify images on a 1:1 ratio, this means that the image depicted on your sensor is the subject’s actual size. Therefore, if your have filled the frame, when you enlarge for example to 10x8 then the subject will still fill the size of the 10x8. This then shows huge detail in the subject you have photographed. This is however, the time you will notice that depth of field can be a real monster and even as little as a millimetre will render parts of your images out of focus. You can focus stack in Photoshop but that only works with static subjects or you can pick which part of your image you want to be in focus, the choice is yours. This is not easy, but a challenge is good!
This lens weighs in at 625 grams or 1lb 6oz in old money, the filter thread is 67mm – not too big, so filters, if needed, are not expensive. The lens’s minimum focussing distance is 0.3 metres with a three position limiter switch. This limiter switch allows the lens to focus, (on auto), from 0.3 to 0.5 M – from 0.5M – infinity or full. The USM focussing motor is virtually silent and is very quick and accurate. It also has full time manual focus which is the best way to focus for macro anyway.
This lens is also weather sealed should you be out in unfavourable conditions. The new Canon ‘Hybrid’ IS system corrects angular movement and also shift, (up and down). Canon claims this gives an effective 4 stops of image stabilization, e.g. you would need a shutter speed of 1/100 sec with no IS and 1/5 sec with IS – I’ll see on that one, we are all different and some people are steadier than others. Extension tubes can be added to get closer to your subject magnifying your image by 1.17 for a 12mm and 1.37 for a 25mm tube. It is possible to focus very close to a subject using these tubes but obviously the subject has to tolerate this proximity. However, for inanimate subjects it is great for seeing huge detail, never seen before for most of us. In addition to macro this lens is also a very good portrait lens. On a full frame camera there is slight vignetting at f2.8 but this all but disappears at f4 and on a crop sensor camera it obviously doesn’t exist at all. It is sharp wide open from corner to corner and you would expect this from a macro lens.
I find hand holding this lens very comfortable and most people could walk around with it attached to an average camera body with little effort. If this combination were attached to a tripod there would be no need for a lens collar because of its light weight and the camera body could be mounted straight onto the tripod, and these tripod collars, for what they are, come in at an outrageous price.
Because insects, dragonflies in particular, are the least active in the very early morning before they have had time to warm up, this is the best time to approach them. However, frustratingly this is when there is usually low levels of light. This photography game is not easy!!
Therefore, in an attempt to overcome this problem I realised flash would have to be used to get well lit sharp images. In order to get said half decent images of small subjects in sometimes awkward lighting conditions I also bought a twin macro flash.
Natural light is always best but sometimes it’s in short supply and you have to compensate.
The Canon Speedlight twin macro flash unit is outrageously priced at around £950.00, absolutely ridiculous!! There is no way I or anybody else with a modicum of common sense should pay this exorbitant price. Therefore, I bought a Yongnuo YN24EX twin macro flash on ebay uk for £170.00.
This is a very well made unit and does exactly the same job as the Canon for a fifth of the price.
It comes with four adaptor rings; 52 / 58 / 67 / 72 mm. The unit weighs 870 grams or 30 oz. this increases the weight of the photographic package and this needs to be considered – please do your own maths for your respective combos. Bearing in mind this unit will only be used when natural light is in short supply.
Power is supplied by 4 X AA batteries.
This unit is mounted onto the front of your lens by first screwing the appropriate adaptor ring onto the filter thread of your lens. Then the main unit fits onto the camera hot shoe like a conventional flash unit. The circular mounting ring is then clipped onto the adaptor ring and finally the twin flash units are clipped into place.
These twin flash units can be moved around the mounting ring circumference and also on their own axis to make the light more diffused if required.
There are a group of LED lights on each unit which can illuminate your subject further in poor light, these can be used independently and in two levels of brightness - they are very handy indeed.
The main flash unit can use ETTL metering which is totally compatible with Canon cameras.
N.B. This unit was for Canon cameras - please check if you are a Nikon camera user etc.
Or alternatively in full manual control as in conventional flash guns.
There is also exposure compensation and front and rear curtain flash for special effects.
The unit comes in a nice quality case with an English manual.
I can recommend this unit, it feels good quality and also performs very well.
This combination will produce great images for people who like macro work and I can highly recommend both.
Item 13
13. Canon RF100-500 f7.1 lens
Recently I sold my little Sigma 150-600 contemporary lens and whilst I have no real complaints about this lens, time moves on. By that I mean I have bought a Canon R5 mirrorless camera which is a major step up from my trusty Canon 7D2 DSLR and to marry up a lens like the Sigma with a new Canon mirrorless body wouldn’t be taking full advantage of the new technology. The Sigma produced some very nice images, especially on my holidays where I wouldn’t take my Canon ef600 f4 mk2 lens because it’s just too big and awkward to travel with and far too expensive to risk in the cargo hold of an aeroplane. The principal problem with the Sigma and the Canon 7D2 is that this combo really struggled to auto focus in diminishing light with the lens at f6.3 and 600mm, it really used to hunt back and fore, and with the 1.4 tele converter attached it was unusable in all but the very brightest sunshine – quite frustrating!
Pleasingly the new Canon R5 on my 600 f4 Mk 2 with the EF/RF adaptor is seamless, even with the Canon 1.4 tele converter and the crop factor selected in the camera giving me 1344mm at f5.6, (600 x 1.6 x 1.4), this is a lot of reach at a very workable aperture and that’s why it’s still much better than the Sigma by a long chalk.
However, it’s about 8.5lbs in old money and that’s still heavy, not as heavy as my old 600mm Mk1 admittedly, because that was like carrying a blacksmith’s anvil! Undeniably though when I’m photographing wildlife from a ‘Stake Out’ in a portable hide e.g. Kingfishers, Cuckoos etc. the image quality is unbeatable. Unfortunately that’s not always possible and there are always scenarios where portability has a distinct advantage. I can’t shoot with the 600 handheld, I’m just not physically capable, and I don’t think many people would be, perhaps a Russian weightlifter might be able to. I have to mount the 600 on a heavy duty gimbal head and that has to be in turn mounted on a sturdy tripod. This accumalated weight is about 20lbs, this may not feel like much at first but after a mile or so believe me it really gets to you. Therefore, without exception everybody gets fed up with carrying this weight and consequently seeks lighter alternatives. This is where I am at the moment, fortunately I am in the financial position where I can afford to keep the 600f4 lens and only use it for certain situations as mentioned above.
A size comparison between EF600 f4 + RF100-500 f7.1
The big question was what I was going to replace the Sigma with as a walk around lens? After much deliberation I have bought the Canon RF 100-500 f7.1 zoom lens. That may seem unwise because the 100-500 is f7.1 at 500mm and Sigma was f6.3 at 600mm. However, the Canon is only f7.1 between 472 and 500mm - the last 28mm, but it is still 100mm shorter than the Sigma. In contrast to the Sigma, however, with the Canon R5 even at f7.1 in the same light the Canon 100-500 auto focus is lightning fast, especially with the animal eye tracking enabled.
A questionable design, however, for some people is with the Canon 100-500 if you attach a tele converter you cannot zoom out below 300mm because there is a physical stop within the lens to prevent the two lens elements, (converter + rear lens), touching each other and causing damage. This is undoubtedly restrictive in some cases but it’s not a problem for me because I only use a tele converter at the ‘Long End’ of a lens. It is, however, something to consider before buying this lens. With a 1.4 tele converter attached the Canon 100-500 is reduced to f10 – very narrow it would seem! The Sigma was reduced to f9 with a 1.4 tele converter. Disappointingly though the combination of the Canon 7D2 and the Sigma was virtually unusable because they performed ridiculously slowly. Conversely the Canon R5 and 100-500 even at f10 in similar lighting conditions focusses so quickly, and without any apparent image degradation.
Another bonus is the in-body image stabilisation (IBIS) in the R5, when this is coupled with the 100-500 image stabilization system it allows you to shoot at really slow shutter speeds or alternatively if you prefer to use faster shutter speeds then the R5 can easily accommodate the correspondingly elevated ISO settings. You can’t alter the laws of physics but these modern cameras certainly go a long way to mitigating these effects. I can now say with confidence that with the 1.4 tele converter attached to the R5, resulting in an f10 aperture on the 100-500 and using the 1.6 crop factor in camera giving a total focal length of 1120mm, (500 x 1.4 x 1.6), there is not a problem in any of my photographic scenarios - and this is handheld!
If there is one small caveat I have about this lens it’s the lack of a mounting lug for a carrying strap. I have seen people carrying them on YouTube by just holding the camera body, that’s not for me, not only is this carrying method putting stress on the camera mount but sooner or later you will probably drop both camera and lens to the ground. To solve this problem I bought a Black Rapid Curve Breathe padded strap that fixes a screw into the lens foot with another safety tether to the camera straps lug. This is a very good strap and carries this lens slung across my shoulders very comfortably indeed, in fact it feels almost weightless. It also allows you to very quickly bring the camera and lens up to the shooting position.
That small issue aside, handholding this combination would have been impossible previously, in addition, such is the efficiency of the in camera and lens dual stabilisation, hand held videos are possible – remarkable!! This removes the need for a tripod, especially on holidays saving more weight and room. Using a combination of the R5 and RF100-500 f7-1 lens is revolutionary for me and I can unequivocally recommend them.
Here is a comparison between the three lenses:
Sigma 150-600
F6.3 at 600mm
Weight 1930g
Filter size 95mm
Length 260mm
MFD 2.8M
Canon RF100-500
f7.1 at 500mm
Weight 1370g
Filter size 77mm
Length 207mm
MFD 1.2M
Canon 600 f4 Mk2
f4 at 600mm
Weight 3920g
Filter size N/A
Length 448mm
MFD 4.5M
With regard to images I live in the real world not a world of comparison charts, a world where wildlife doesn’t stay still and pose for you and your images are the real evidence of how a lens is performing. Yesterday Susan and I were walking along the banks of a local river when we spotted a female Goosander, now these are very spooky ducks which will immediately swim away or fly off as soon as they see you. This duck was about thirty yards away and true to form it started to swim away as soon as it saw us. However, I managed to get a shot - the R5’s animal eye tracking locked on immediately. I wouldn’t have got this shot with the Sigma because of the auto focus delays I know I would have had. It was all over if a few seconds. The lens aperture of f7.1 posed no problems whatsoever.
Here are some images taken wth this lens.
Female Gooseander, handheld.
A pair of Goldfinches squabbling in my garden in very variable light.
Lovely clarity with this lens.
Red Footed Falcon in flight - Handheld - Lesvos 2023
In summation;
If anyone is considering buying this lens but is worried by the perceived 'Narrow' aperture of f7.1 then I can honestly say this should not be a consideration. (Admittedly the DOF produced by a lens with a 'Narrower' aperture will be deeper and therefore less buttery smooth then the DOF produced by a big prime lens eg 600 F4. However, as can be seen in the above images, with regard to backgrounds, employing a little thought while setting up shots can partially mitigate the effects of DOF.
With regard to light when coupled with a camera like the Canon R5 (or I'm sure the Canon R6), there is nothing to worry about because you can shoot at very high ISO's and still obtain relatively clean images. In addition a recommended buy for a very reasonable price of just over £100 is the (Topaz AI denoise software), which will very effectively clean up most noisy images in post processing.