Neutral Density filters.
05th August 2015
Things are very quiet at the moment, a sort of ornithological hiatus is presiding. In addition to this the weather has been appalling throughout July and into early August, long periods of gloom compounded with drizzle and gusty winds have been the norm. To prevent going into a state of torpor I have been doing a lot of work in my garden during this period and now that I have completed all this work, I thought I'd get out for a walk.
I don't use many filters when shooting landscapes, usually just a circular polarizer, but I thought I'd have some fun with an ND filter today, just for the hell of it.
These filters basically allow the user to shoot long exposures without 'Blowing' the image and without these filters images tend to burn into a white-out when exposed for long periods. Basically these filters act like a strong pair of sunglasses over your lens.
They come in various strengths from lightly tinted right up to what are nicknamed the 'Big Stoppers'. These high density filters stop about 10 f stops of light and you cannot see through them at all. However if you want to just give your images some nice effects without going right over the top, a filter of about ND256 is fine. This stops around 7 stops of light and will smooth out water and accentuate cloud movement. These effects can give some drama and movement to a static image. Most importantly these filters do not affect the colour or balance of your images.
I have always used Hoya filters because I find they are well made and reasonably priced.
A note of warning;
As I have mentioned previously, cheap filters are not cheap really, they are just nasty and in this instance they will give a horrible colour cast to your images and possibly cause vignetting.
I set my gear up today on a shallow limestone pavement with water rushing over it to a depth of about a foot. I walked across onto a slightly raised dry area above the water. From here I could put my rucksack down safely and readily access my kit, this is very important to avoid accidents.
In this area I could hide quite effectively behind some bushes once I was set-up and this has previously allowed me to observe Kingfishers, Dippers, Grey Wagtails and Grey Herons.
To set up the shot below;
Use the lowest ISO setting available on your camera and also use a small aperture, typically ISO 100 and f11.
i. Compose and focus as normal, use a remote shutter release.
ii. Note your settings, 'shutter speed'.
iii. Switch off the auto focus.
iv. Attach the ND filter.
v. Cover the camera eyepiece with a piece of black tape.
vi. Switch to manual exposure control.
There are some very useful apps around today and you can download from 'Google Play' an app which will accurately calculate your new shutter speed that you must use with the ND filter attached.
To use this 'FREE' app on your smartphone just key in your original shutter speed, prior to the ND filter, key in your ND filter strength eg ND256 and press calculate and your new shutter speed is provided. No pieces of paper with charts on and more importantly no trying to guess from memory.
vii. Dial in your new shutter speed.
vii. Take your shot remotely and ensure you dont move the camera.
Depending on what you want to achieve, check your image and try increasing or decreasing your shutter speed.
NB. If your revised shutter speed is above 30secs you must use the 'Bulb' mode on your camera, this means that when you press the remote shutter release and lock it, the shutter will remain open until it is released!!
You have to manually time this exposure.
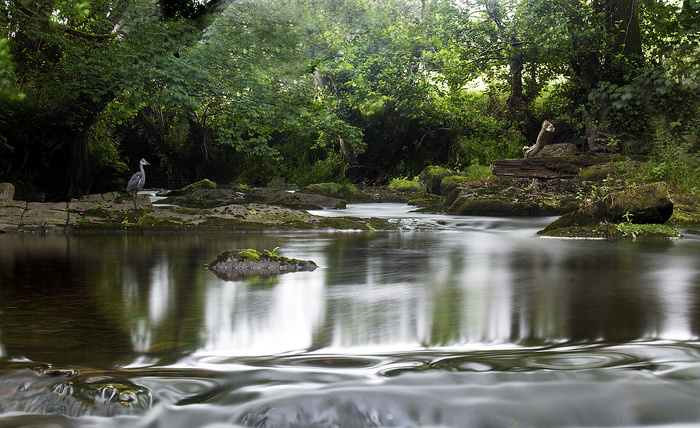
It helps if you have a static Grey Heron in the shot!!
I don't use many filters when shooting landscapes, usually just a circular polarizer, but I thought I'd have some fun with an ND filter today, just for the hell of it.
These filters basically allow the user to shoot long exposures without 'Blowing' the image and without these filters images tend to burn into a white-out when exposed for long periods. Basically these filters act like a strong pair of sunglasses over your lens.
They come in various strengths from lightly tinted right up to what are nicknamed the 'Big Stoppers'. These high density filters stop about 10 f stops of light and you cannot see through them at all. However if you want to just give your images some nice effects without going right over the top, a filter of about ND256 is fine. This stops around 7 stops of light and will smooth out water and accentuate cloud movement. These effects can give some drama and movement to a static image. Most importantly these filters do not affect the colour or balance of your images.
I have always used Hoya filters because I find they are well made and reasonably priced.
A note of warning;
As I have mentioned previously, cheap filters are not cheap really, they are just nasty and in this instance they will give a horrible colour cast to your images and possibly cause vignetting.
I set my gear up today on a shallow limestone pavement with water rushing over it to a depth of about a foot. I walked across onto a slightly raised dry area above the water. From here I could put my rucksack down safely and readily access my kit, this is very important to avoid accidents.
In this area I could hide quite effectively behind some bushes once I was set-up and this has previously allowed me to observe Kingfishers, Dippers, Grey Wagtails and Grey Herons.
To set up the shot below;
Use the lowest ISO setting available on your camera and also use a small aperture, typically ISO 100 and f11.
i. Compose and focus as normal, use a remote shutter release.
ii. Note your settings, 'shutter speed'.
iii. Switch off the auto focus.
iv. Attach the ND filter.
v. Cover the camera eyepiece with a piece of black tape.
vi. Switch to manual exposure control.
There are some very useful apps around today and you can download from 'Google Play' an app which will accurately calculate your new shutter speed that you must use with the ND filter attached.
To use this 'FREE' app on your smartphone just key in your original shutter speed, prior to the ND filter, key in your ND filter strength eg ND256 and press calculate and your new shutter speed is provided. No pieces of paper with charts on and more importantly no trying to guess from memory.
vii. Dial in your new shutter speed.
vii. Take your shot remotely and ensure you dont move the camera.
Depending on what you want to achieve, check your image and try increasing or decreasing your shutter speed.
NB. If your revised shutter speed is above 30secs you must use the 'Bulb' mode on your camera, this means that when you press the remote shutter release and lock it, the shutter will remain open until it is released!!
You have to manually time this exposure.
It helps if you have a static Grey Heron in the shot!!